Search This Blog
TOU
My tutorials are written by me and are the results of my own imagination. Any resemblance to another tutorial are purely coincidental.
Please DO NOT claim any of my tutorials as your own.
You may us my tutorials for challenges but please link to my tutorial on my blog.
You may not translate my tutorials.
DO NOT RIP MY TAGS
If you have any questions regarding my tutorials, please feel free to email me at gwils2007@gmail.com
Monday, February 5, 2024
Boehoeh
This tutorial was written by me on September 26, 2020. The results are of my own imagination. Any resemblance to another tutorial is purely coincidental.
Please DO NOT claim this tutorial as your own.
This was written assuming you have a working knowledge of PS.
Please keep in mind that I write the tutorial as I am creating it.
Sometimes I may not explain properly where to place things so please see my example if you are ever in doubt :)
Supplies needed
I am using CS5 but this tutorial should work with any version.
You can download the 7 day trial of PS here.
PTU Kit: I am using a gorgeous kit called "Boehoeh" created by Hania's Design. You can purchase the kit at Elegance Fly here.
PTU Animation: I am using Kiya Designs awesome Halloween tube animation from her new packs Halloween 2. You can purchase Kiya's animation at her store here.
Mask: 4hwmask2.fecnikek (2) and 4hwmask2.fecnikek (1). Thank you for your awesome masks. You can download it from Fecnikek's blog here.
Please read all the Artist's/Designer's TOU.
Font of choice for your name.
Plug in: None
Drop shadow of choice.
Please read all the Artist's/Designer's TOU.
Let's get started.
Remember to save your tag often in case PS crashes. I always save my tags as a psd image. It keeps all the layers and if you make tags for others you will always have the template.
To open an image, I click on the element or paper in the file folder and drag it into PS.
To transfer an element or paper in PS to my tag, I left click and drag it into my working canvas.
The other way is to left click and drag the element from the folder right onto your tag.
Either way you will get the same results :). I will be using the both method for this tutorial.
For resizing and rotating I use the Ctrl+T command.
To mirror or Flip go to Image, Image rotation, Flip Canvas Horizontal (mirror) or Flip canvas vertical (Flip).
Let's get started.
Open a new 800x800 transparent image. We will resize later.
Go to layers, New fill layer, solid color. When the pop up window appears type in FFFFFF and click ok.
Select 4hwmask2.fecnikek (2) and drag it into the tag. Your free transformation box will appear. Click the link icon between the W and H and type 15%. Click ok. Move to the top left corner of the tag.
Select 4hwmask2.fecnikek (1) and drag it into the tag. Your free transformation box will appear. Click the link icon between the W and H and type 20%. Click ok. Move over mask 2 and move down to the right. Once happy with placement, holding down the ctrl key, select the bottom mask. Right click and merge layers.
Add a mask layer to the mask. Select the brush tool and the new mask layer. With the foreground set as white, paint on the bottom right of the mask to hide some of it. See mine for example.
Drag paper 13 into your tag. Click the link icon between the W and H and resize 35%. Click the check mark. Right click and select create a clipping mask.
Drag element 28 into your tag. Click the link icon between the W and H and resize 15%. Click the check mark. Move to the top left of the mask.
Drag element 30 into your tag. Click the link icon between the W and H and resize 20%. Click the check mark. Move to the top right of the mask.
Drag element 60 into your tag. Click the link icon between the W and H and resize 20%. Click the check mark. Move to the top left of the mask.
Drag element 86 into your tag. Click the link icon between the W and H and resize 15%. Click the check mark. Move to the bottom left of the creepy tree.
Drag element 72 into your tag. Click the link icon between the W and H and resize 35%. Click the check mark. Move to the top of the mask.
Drag element 97 into your tag. Click the link icon between the W and H and resize 18%. Click the check mark. Move to the top of the mask.
Drag paper 15 into your tag. Click the link icon between the W and H and resize 15%. Click the check mark. Drag this layer under the frame layer.
Select the frame layer. Using your magic wand, click inside the frame. Select, modify, expand by 5.
Select the paper layer. Layers, layer mask, reveal selection.
Still on the paper layer.
Drag element 8 into your tag. Click the link icon between the W and H and resize 15%. Click the check mark. Move to the left of the of the frame. Now holding down the Alt key on your keyboard, select the mask layer on the paper layer and drag it onto the tree layer.
Select the frame layer.
Drag element 6 into your tag. Click the link icon between the W and H and resize 15%. Click the check mark. Move to the bottom right of the frame.
Drag element 78 into your tag. Click the link icon between the W and H and resize 15%. Click the check mark. Move to the bottom of the castle.
Drag element 34 into your tag. Click the link icon between the W and H and resize 20%. Click the check mark. Move over the frame. Duplicate, holding down the Ctrl key, select the original web layer. Right click and merge layers.
Drag element 8 into your tag. Click the link icon between the W and H and resize 20%. Click the check mark. Move to the top right of the frame.
Drag element 41 into your tag. Click the link icon between the W and H and resize 15%. Click the check mark. Move to the bottom left of the books.
Drag element 79 into your tag. Click the link icon between the W and H and resize 10%. Click the check mark. Move to the bottom center of the frame.
Drag element 82 into your tag. Click the link icon between the W and H and resize 15%. Click the check mark. Move to the bottom left of the frame.
Drag element 56 into your tag. Click the link icon between the W and H and resize 10%. Click the check mark. Move to the bottom left of the frame in front of element 82.
Drag element 42 into your tag. Click the link icon between the W and H and resize 20%. Click the check mark. Move to the bottom right of the frame.
Drag element 88 into your tag. Click the link icon between the W and H and resize 12%. Click the check mark. Move to the bottom left of the Cauldron.
Drag element 53 into your tag. Click the link icon between the W and H and resize 12%. Click the check mark. Move to the bottom right of the Cauldron.
Drag element 5 into your tag. Click the link icon between the W and H and resize 12%. Click the check mark. Move to the bottom right of the Pumpkin.
Drag element 2 into your tag. Click the link icon between the W and H and resize 30%. Click the check mark. Move to the bottom of the mask. Duplicate, select the first grass layer and move this down and to the right. Holding down the ctrl key, select the duplicate grass layer. Right click and merge layers. Duplicate this layer and drag down the layer pallet to above the clipping mask paper. I duplicated it two more times and move each layer into a different area on the mask.
Open Kiya's Halloween 06 psd file. Hold down the Ctrl key and select all 10 frames. Hit Ctrl + G to group them. Select the group 1 layer and drag it into your tag. Resize 55% and move to the bottom of the center grass. See mine for placement.
Open Kiya's Halloween 09 psd file. Hold down the Ctrl key and select all 10 frames. Hit Ctrl + G to group them. Select the group 1 layer and drag it into your tag. Resize 40% and move to the bottom left of the grass in front of the pumpkins. See mine for placement. Rename Group 2.
Open Kiya's Halloween 07 psd file. Hold down the Ctrl key and select all 10 frames. Hit Ctrl + G to group them. Select the group 1 layer and drag it into your tag. Resize 12% and move to the bottom right of the grass in front of the Castle wheel. See mine for placement. Rename Group 3.
Add any other elements you like and make any adjustments to the layers.
Crop away any extra space.
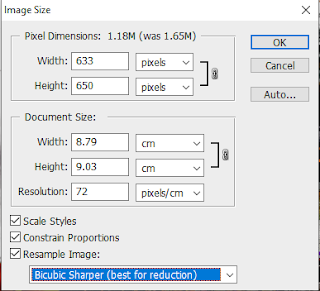
Image, Image Size and resize 650 on the longest side. See my settings below.
Oh almost forgot we need to drop shadow all of our elements. I actually do the drop shadow at the end :)
Select the element on the bottom of your tag in the layer pallet and double click it.
A layer style window will pop up. Click on Drop shadow. and use the following settings.
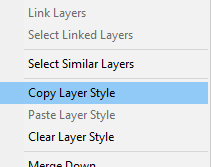
Now right click on the layer you just applied the drop shadow. Click copy layer style.
Now click on the layer above and hold down the shift key, select the layer just under the paper layer. Right click and paste layer styles.
Now click on the frame layer above and hold down the shift key, select the layer just under the groups. Right click and paste layer styles.
Now click on down arrow beside the group layer. Select frame 1, hold down the shift key and select frame 10. Right click and paste layer styles.
Repeat the above steps for the next two animation groups.
Drop shadow complete :)
Add your copyright and name.
If you do not want to animate. Hide the white background layer Save your tag and export as png.
Might want to grab a coffee :)
Click on the little white arrow beside Group 1 to expand it. Click on the eyeball of each layer to hide it but leave frame layer 1 visible. Click on the arrow beside group one to hide it as we do not want to accidentally make any changes.
Repeat the above step for the other two animations.
Next make sure your animation viewer is open on the bottom of PS. I you do not see a row that has Animation (Frames) on the bottom, go to Windows, Animation.
Next is animating.
Click on the little icon at the right end of the animation screen then select make frames from layers.
When the pop up shows select Make Frames from Layers
You are going to see a big mess in the animation window but we are going to fix this.
Click on the first frame and click on the trash can in the animation window. Repeat this until you reach the first frame of the animation.
Now you should be at the first frame of the animation. Click on frame 11 and hit the trash can. Repeat for all the remaining frames. You should be left with 10 frames in the animation window. This is the amount of frames for our animation.
This next step is very important. Any changes you do from here you must be on frame 1 in the animation window. It will be highlighted in blue. Unless otherwise stated.
Go to the bottom of your tag in the layers pallet. Make sure you have animation frame 1 selected.
Click on the eyeball beside each layer to make it visible. For the white base layer you may have to click on the eyeball a couple of times to make it visible in all the animation frames. It's a Photoshop thing. Do not touch the group layers.
All frames visible?
Do Not make any changes to Group 1.
Select frame 2. Expand animation groups 2 and 3. Hide frame 1 and make frame 2 visible for each group.
Select frame 3. Hide frame 1 and make frame 3 visible for each group.
Repeat the above steps for frames 4 through 10.
Next, I want to slow down the animation. With the first frame selected, hold down the shift key and click on frame 10. This will select all the frames.
Next, click on the little black arrow beside the 0 sec as we want to change the speed. A pop up window will appear.
I selected 0.2 Sec. Now click on the play button to view the animation. Click on it again to stop it.
Click frame 1 again so we don't accidentally make any changes.
Now to save our tag as a gif.
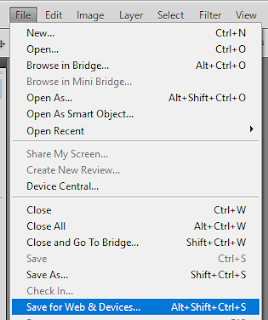
Go to File, save for web device.
A new pop up window will appear. Change the settings to my screen shot below. Click on the image to enlarge it if needed. Click save. My screen shot will look different but the settings are the same.
I hope you have enjoyed my tutorial. I would love to see your results.

Labels:Animated Tutorial,Dark/Gothic/Halloween,Hania's Design,Kiya Designs,PS Tutorial,PTU Kit,PTU tube
Followers
Labels
- Abby Dawn
- Adrienne's Designs
- AI Tube
- Alex Prihodko
- Amber
- Animated Tutorial
- Animating with mng file
- Animating with psd file
- Animating without pre-made animation
- Anna Marine
- AoRK
- Applying a mask to Animation
- Atarika
- Atelier de Minja
- Attila
- Autumn
- Awareness
- Barbara Jensen
- Barbara Jensen Bonus Tube
- Bella Caribena
- Canada Day
- Carita Creationz
- Cartoon Pink
- CDO
- Changing the Blend mode of Animation
- Chaos Priestess
- Christmas
- Circus
- Colorizing psd animation in psp
- Covid-19
- Curious Creative Dreams
- Dark/Gothic/Halloween
- Dilara
- Doodle by Design
- Easter
- Egyptian
- Elegance Fly
- Elias Chatzoudis
- Enamorte
- Enys Guerrero
- Fantasy
- Fiodorova Maria
- Foxys Designz
- FTU Animation
- FTU Scrap kit
- FTU Tube
- FTU WordArt
- Goldwasser
- Gothic Inspirations
- GriAnna
- Hania's Design
- Indigenous
- Jeff Haynie
- Jenny
- Julsy
- Karmalized Scraps
- Katharine
- Kela
- Kiya Designs
- Kizzed by Kelz
- Lady Mishka
- Ladyhawwk Designs
- Mardi Gras
- Martin Abel
- Maryline Cazenave
- Medical
- Mermaid
- Misticheskaya
- MizTeeques
- Mother's Day
- New Years
- No Scraps
- Nocturne
- PFD
- Pink Paradox Productions
- Pirate
- PS Tutorial
- PSP Beginner tutorial
- PSP Tutorial
- PTU Cluster
- PTU Kit
- PTU tube
- PTU Tutorials
- Rebecca Sinz
- Rebel Dezigns
- School
- Sheokate
- Sophisticat Simone
- Spring
- St. Patrick's Day
- Stan Dudin
- Stanley Morrison
- Steampunk
- Stella Felice Art
- Summer
- TADD
- Taggerworld
- Thanksgiving
- Tiny Turtle Designs
- Using a JPG mask in PS
- Using multiple animations
- Valentine
- Verymany
- Vintage
- VM Artists
- Wedding
- Western
- Wicked Princess Scraps
- Winter
- Yuriko Shirou
Blog Archive
-
▼
2024
(272)
-
▼
February
(272)
- Steampunk Valentine
- Hanny
- I love Icecream
- Vintage Haunting
- Butterfly Dreams
- Arabian Nights
- Pink kind of Girl
- Champagne Wishes
- Cute Sailor
- Ocean Beauty
- Tropical Vacation
- Purple & Steamy
- Sunshine Vibes
- Burlesque
- Green Apple
- Pink & Steamy
- Green Steam Dream
- Pirate's Adventure
- Fanta Sea
- Gothic Romance
- Under the Sea Beauty
- PTU: Bastet
- FTU: Secrets
- FTU: Smell the Coffee
- PTU: Frankie's Girl
- PTU: Halloween Party
- PTU: Alice's Nightmare
- FTU It's Magic
- FTU Blue Feeling
- FTU: Mindful Angel
- PTU: Cup of Tears
- Blue Beauty
- Witch's Web
- Let is Snow
- Happy New Year
- Alice in Wonderland
- Irish Spirit
- FTU: Mindful Angel
- FTU: A hint of Goth
- FTU: Autumn Days
- FTU: Forever Dark
- FTU: A Taste of Halloween
- FTU: Recover
- FTU: Romantic Steampunk
- FTU: Insoluble Mystery
- FTU: Ladybug Dreams
- Steam 3
- Tonya
- Ahoy Sailor
- Lift Off
- Autumn Gothique
- Gentle Forest
- PTU: Watermelon
- FTU: Beach
- Color Pop 12
- Precious Memories
- Color Pop 9
- Donut Mocha
- Spirit Guide
- Enchanted Fantasy
- Mysteries of the Forest
- Gothic Girl Summer
- Waiting
- Cassandra
- Some Kind of Fairytale
- Tropicana
- Mermaid Song
- Alice
- Amazon
- Valyria
- Mermaid Tears
- Secrets
- Steam Punk Beauty
- Autumn Dreams
- Tangled Web
- Happy Bride
- If the Broom Fits
- Heading Down the Highway
- Pizza Time
- Steamy Autumn
- Sun Kissed
- Sunflowers & Coffee
- Autumn Solitude
- Memories of a Witch
- Secret Garden
- You are my Sunshine
- Shades of Green Steam
- Barbara Jensen Learning tutorials part 3. Animatin...
- Barbara Jensen Learning tutorials part 2. Animati...
- Autumn Mouse
- Learning tutorial 1 - Barbara Jensen Free Tube & K...
- Technolime
- Wickedly Bootiful
- Smiling Hedgehog
- Whimsical Circus
- Halloween Party
- Baba Yaga
- Ghoulishly Delightful
- Autumn Mourning
- Timeless Navigator
-
▼
February
(272)


