My Tag Blog

Favorite Stores
















My Favorite Blogs
























Showing posts with label PSP Beginner tutorial. Show all posts
Showing posts with label PSP Beginner tutorial. Show all posts
Wednesday, February 7, 2024
FTU: Ladybug Dreams


Barbara Jensen Learning tutorials part 3. Animating with a psd and mng file

This tutorial was written by me on June 24, 2020. The results are of my own imagination. Any resemblance to another tutorial is purely coincidental.
Please DO NOT claim this tutorial as your own.
This was written assuming you have a working knowledge of PSP.
Please keep in mind that I write the tutorial as I am creating it.
Sometimes I may not explain properly where to place things so please see my example if you are ever in doubt :)
Please remember to read the Terms of Use (TOU) for any tube, scrapkit and/or animation you use.
We will be using two different animations for this tutorial and using two different methods. I will explain the steps on how to do this.
Supplies needed
I am using PSP 2018 but this tutorial should work with any version.
Animation Shop 3.11
PSPIMAGE tag file from Learning tutorial 1 - Barbara Jensen Free Tube & Kit Part 1. You can find the tutorial here. Delete the tube layer in this file as we will be replacing it with the animated tube. Resave as Barbara Jensen Lesson part 3.pspimage.
Beautiful free to use animated Blameless tube by Barbara Jensen. You can find the tube here. You do not need a license to get this gorgeous tube but you do have to be registered with the store.
Awesome free to use animation by Kiya Designs. You can download it from Barbara Jensen's store here.
You do not need a license to get this gorgeous animation but you do have to be registered with the store.
We will be using the PSD file and mng for this tutorial.
Let's get started.
Open your pspimage tag from the tutorial mentioned above in psp.
Open Animated Blameless2.psd in psp. You will notice there is 16 frames for this animation.
Open KDAnimations-Freebie2.mng file in Animation shop. You will notice there is 16 frames for this animation.
Let's get started.
We will be working the the animation psd file first.
In the layers pallet you will notice there are 16 frames. 16 frame layer at the top and if you scroll right down you will see frame 1 at the bottom.
Standing on Frame layer 16 - it will be highlighted in blue.
We want to select all our layers. To do this, hold down your Ctrl key on your keyboard, and with your mouse, select the next layer which is frame 15. Repeat the holding down the Ctrl key and click on frame 14. As you can see in my screen shot that the selected layers are all highlighted in blue.

Continue this process until you have all the layers selected. You can use the scroll bar in the layers pallet to view the lower layers. Just make sure the Ctrl key is not pressed when you scroll down.
When you reach Frame 1 all layers should be selected. You can use the scroll bar to double check. If you missed one just hold down the Ctrl key and click on that layer.
All layers selected or highlighted in blue? If they are not repeat the steps above.
Yes? Ok on to the next step.
We need to group our selected frames.
Go to Layers>New Layer Group.

Another way to group the layers is by clicking on the New Layers Group icon. You can locate it at the bottom of your Layers pallet. It is the square with, looks like, two papers stacked above one another. It should also be next to your trash can. See my screen shot below.
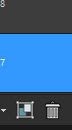
When you select the New Layers Group a pop up window will appear. You can rename this Blameless or leave it as Group 1. All other settings will stay the same. Click ok.

Screen shot is different on the screen image but the settings are the same.
You will notice you have a new layer at the top of the layers pallet called Group 1 (or something different if you renamed it) with all the layers under it as sub layers. See my screen shot below.

Does your layer pallet look like this so far? If Yes on to the next step.
We need to link our group to the sub-layers. In my screen shot above you will notice an icon that looks like a chain link. We will be using this next.
This part is very important. When working with group layers, always make sure the main group layer is highlighted or selected. The sub-layers should not have any highlights on them.
When we move or resize a group it is done by selecting the Group layer. What we do to the group layer will affect the sub frame layers. For example, we resize Group 1 layer by 80%. All the sub layers will be resized at the same time.
Ok enough of me babbling.
Is Group 1 selected? Good. Click on the link icon at the top of the layers pallet. You will notice a little link will appear on Group 1. We want to see that.

Next we need to copy the group so we can have it on our tag.
Standing on Group 1 layer,
Go to Edit>Copy or Ctrl + C on your keyboard.
Select your tag. It does not matter if you select a layer on your tag as the Group animation will always paste to the top in the layer pallet.
Go to Edit>Paste as a new layer.
Your tag should look like this.

And your layer pallet should look like this.

You can close the duplicated animation as we no longer need it. You do not have to save the changes.
Ok standing on Group 1 layer. See that little white down arrow on the left beside the group one layer. Click it to hide the group sub layers.
Next. I want to move this group 1 layer just above my watch layer. You can either select the group 1 layer and drag it down the layer pallet but since my frame layer is close to the bottom I am going to do the following:
Go to Layers>Arrange>Send to Bottom.
Your layer pallet should look like this.

Select Group 1 layer if it isn't already. Holding down the left mouse button drag the Group 1 layer above the frame layer. Or you can go to Layer>Arrange>Move up until the group 1 layer is above the watch.
Your layer pallet should look like this.

Next we need to resize the animated tube as it is larger then our tag.
Make sure Group 1 is selected.
Go to Image, Resize. When the Resize box pops up, in the Percent field type 54 as we want to resize it by 54%. All layers not checked and click ok. See my screen shot bellow for the settings.

Now we need to sharpen each layer of the animation. Highlight frame 1 go to adjust> sharpness> sharpen. Repeat the above step for the remaining frames 2 - 16.

Next, we need to add a drop shadow to each layer. Standing on frame 1 go to Effects>3D Effects>Drop shadow.

The settings are as follows:
Vertical 0
Horizontal 5
Opacity 50
Blue 10
Color Black.
Shadow on new layer unchecked. Click ok.
Repeat the drop shadow for frames 2 - 16.
Ok now we need to move it into place. Make sure that Group 1 is still selected.
Select the Pick tool.

If you do not see it under the magnifying glass, click on the little white arrow and it will be hiding in there.
With your left mouse click on the center dot. Holding down your left mouse button, move the animation into a spot you like. See my screen shot below for where I placed it.

We are almost ready for animation shop.
I want my second animation to be above the frame layer but we are using the mng animation file for the sparkle.
Go to Layers>View>None. This will hide all our layers.
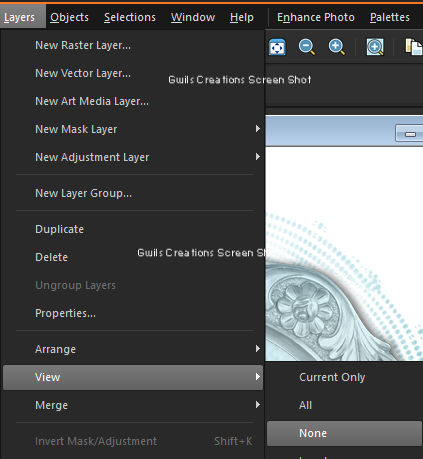
Scroll to the bottom of the layer pallet and click on the eyeball for each of these layers to make them visible.

Background
Mask
Paper
Frame
All other layers are hidden.
Go to Selections>Select all. We will need to keep this selected for the entire copy/paste into animation shop. The select all will keep the size of our tag.
Go to Edit>Copy Special>Copy Merged.

Go to Animation Shop.
Edit>Paste>Paste as new animation. or Ctrl + V

This will give us the first frame of our animation but we need 16.
Holding down the Ctrl+Shift tap the L key on your keyboard 15 times.
You should have a total of 16 frames. It will show you in the bottom right corner.

You should have Kiya Designs free animation 2 open in Animation shop. If not please click and drag it in to the workspace. (same process as clicking and dragging for psp).
Go to Edit>Select all.


We need to resize the animation by 60%.
To do this, go to Animation>Resize Animation.

A resize box will pop up. Select by Percentage of original and type 60 in the box to resize it by 60%. See my screen shot for the settings below. Click ok.

Next, go to Edit>Copy or Ctrl+C on your keyboard.
Select the new frame animation and select all.
Go to Edit>Paste into selected frames or Ctrl+E on the keyboard.

The animation will be handing off your mouse pointer. If you move the mouse up and to the left you will see it. Try to place the animation in my screen shot below. Once you have it in position, left click and it will place the animation. If you do not like the placement, you can undo or Ctrl + Z and try placing it again by hitting Ctrl + E.

You can now close Kiya's animation as we no longer require it.
To view the animation go to View>Animation

or click on the Animation icon next to the pointer with the ?.

You can click on the animation icon to close the preview.
Next, We need to bring over the animated tube into animation shop.
Go back to psp.
Go to Layers>View>All.
Scroll down to the tube group layer, click on the little arrow beside the group layer to expand it. Now click on the little eyeball beside each frame to hide them but leave frame 1 visible.
Scroll to the bottom and hide the following layers.
Background
Mask
Paper
Frame
Next, with frame layer one visible, go to Edit>Copy Special>copy merged.

Back to Animation Shop.
Go to Edit>Past>As new Animation or Ctrl + V on the keyboard.
**Back to paintshop (psp).
Left click on the eyeball beside layer 1 to hide it and click on the eyeball on layer 2 to make is visible.
With frame layer two visible, go to Edit>Copy Special>copy merged.
Back to animation shop.
Go to Edit>Paste>After current frame or Ctrl + Shift + L on the keyboard.**
If you look on the bottom right corner of Animation shop it will show you how many frames are in the animation. Currently, there is two.
We are going to repeat from ** TO ** until we have 16 frames in animation shop.
Now that we have 16 frames in animation shop. Go to Edit>Select all.
Next Edit>Copy or Ctrl+C on your keyboard.
Select the new frame animation and select all.
Go to Edit>Paste into selected frames or Ctrl+E on the keyboard.
The animation will be handing off your mouse pointer. If you move the mouse up and to the left you will see it. Try to place the Animated tube portion on the left of the frame. In the same place it was on the tag. Once you have it in position, left click and it will place the animation. If you do not like the placement, you can undo or Ctrl + Z and try placing it again by hitting Ctrl + E.

You can now close the tube animation as we no longer require it. Do not save changes.
Now we have 16 frames in animation shop but we do not know how the animation looks yet.
To view the animation go to View>Animation or click on the Animation icon next to the pointer with the ?.
I found the animation to fast and I want to slow this down.
To control the speed of the animation first you need to select all the frames.
Go to Edit>Select all or Ctrl + A on the keyboard.
Next go to Animation>Frame Properties.

When the pop up window appears change the display time to 12 and click ok.

Screen shot differs. Please type 12 where the 15 is showing.
For the display time, the higher the number the slower the animation will be.
You can view your animation again to see the difference.
Time to save the animation.
Go to File>Save As.

When the pop up box shows, find a place to save it on your computer, name the file and the save as type should be gif. See screen shot below.

A new pop up box will appear. I always choose the following. Better Image Quality.

Click on Customize button.
On the Colors tag my settings are 255 Colors, Optimized Octree and Error Diffusion selected.

On the Optimizations tab I have the three center boxes checked and the first and last box unchecked. Click ok.

Click Next, Next, Next and Finished.
You have just completed an animated tag using a psd file and mng file.
I hope you have enjoyed my tutorial. I would love to see your results.

Barbara Jensen Learning tutorials part 2. Animating with a psd file

This tutorial was written by me on June 18, 2020. The results are of my own imagination. Any resemblance to another tutorial is purely coincidental.
Please DO NOT claim this tutorial as your own.
This was written assuming you have a working knowledge of PSP.
Please keep in mind that I write the tutorial as I am creating it.
Sometimes I may not explain properly where to place things so please see my example if you are ever in doubt :)
Please remember to read the Terms of Use (TOU) for any tube, scrap kit and/or animation you use.
Supplies needed
I am using PSP 2018 but this tutorial should work with any version.
Animation Shop 3.11
PSPIMAGE tag file from Learning tutorial 1 - Barbara Jensen Free Tube & Kit Part 1. You can find the tutorial here.
I am using a Pay to Use (PTU) animation 31 from pack 9 created by Kiya Designs.
You can purchase this fun animation from Barbara's store here.
We will be using the PSD file for this tutorial. I will show you how to use the MNG file in my next tutorial.
Let's get started.
Open your pspimage tag from the tutorial mentioned above in psp. Holding down the shift + D duplicate the tag and close the original. Do not save changes.
Open KDAnimations-31.psd file in psp. Holding down the shift + D duplicate the animation and close the original. Do not save changes.
We will be working the the animation psd file first.
In the layers pallet you will notice there are 31 frames. Frame 31 layer at the top and if you scroll right down you will see frame 1 at the bottom. We could use all 31 layers but it would take forever to copy and paste it into animation shop.
I am going to show you how we cull the animation before we use it in our tag.
Standing on layer 31 - it will be highlighted in blue.

We want to select all our odd layers. To do this, hold down your Ctrl key on your keyboard, and with your mouse, select the next odd layer which is frame 29. Repeat the holding down the Ctrl key and click on frame 27. As you can see in my screen shot that the selected layers are all highlighted in blue.

Continue this process until you have all the odd layers selected. You can use the scroll bar in the layers pallet to view the lower layers. Just make sure the Ctrl key is not pressed when you scroll down.

When you reach Frame 1 all odd layers should be selected. You can use the scroll bar to double check. If you missed one just hold down the Ctrl key and click on that layer. If you notice you selected an even numbered frame that is ok we can fix that by once again holding down the Ctrl key and click on that layer. It will deselect (unlighted in blue).
All odd layers selected or highlighted in blue? If they are not repeat the steps above.
Yes? Ok on to the next step.
We need to group our selected frames.
Go to Layers>New Layer Group.

Another way to group the layers is by clicking on the New Layers Group icon.

You can locate it at the bottom of your Layers pallet. It is the square with, looks like, two papers stacked above one another. It should also be next to your trash can. See my screen shot below.
When you select the New Layers Group a pop up window will appear. You can rename this animation or leave it as Group 1. All other settings will stay the same. Click ok.

You will notice you have a new layer at the top of the layers pallet called Group 1 (or something different if you renamed it) with all the odd layers under it as sub layers. See my screen shot below.
Does your layer pallet look like this so far? If Yes on to the next step.

We need to link our group to the sub-layers. In my screen shot above you will notice an icon that looks like a chain link. We will be using this next.
This part is very important. When working with group layers, always make sure the main group layer is highlighted or selected. The sub-layers should not have any highlights on them.
When we move or resize a group it is done by selecting the Group layer. What we do to the group layer will affect the sub frame layers. For example, we resize Group 1 layer by 80%. All the sub-layers will be resized at the same time.
Ok enough of me babbling.
Is Group 1 selected? Good. Click on the link icon at the top of the layers pallet. You will notice a little link will appear on Group 1. We want to see that.

Next we need to copy the group so we can have it on our tag.
Standing on Group 1 layer,
Go to Edit>Copy or Ctrl + C on your keyboard.

Select your tag. It does not matter if you select a layer on your tag as the Group animation will always paste to the top in the layer pallet.
Go to Edit>Paste as a new layer.

Your tag should look like this.

And your layer pallet should look like this.

You can close the duplicated animation as we no longer need it. You do not have to save the changes.
Ok standing on Group 1 layer. See that little white down arrow on the left beside the group one layer. Click it to hide the group sub layers.
You layer pallet should looks something like this.

Next. I want to move this group 1 layer just above my frame layer. You can either select the group 1 layer and drag it down the layer pallet but since my frame layer is close to the bottom I am going to do the following:
Go to Layers>Arrange>Send to Bottom.

Your layer pallet should look like this.

Select Group 1 layer if it isn't already. Holding down the left mouse button drag the Group 1 layer above the frame layer. Or you can go to Layer>Arrange>Move up until the group 1 layer is above the frame.
Your layer pallet should look like this.

Next we need to resize the animation as it is very large.
Make sure Group 1 is selected.
Go to Image, Resize.

When the Resize box pops up, in the Percent field type 40 as we want to resize it by 40%. All layers not checked and click ok. See my screen shot bellow for the settings.

Ok now we need to move it into place. Make sure that Group 1 is still selected.
Select the Pick tool.

If you do not see it under the magnifying glass, click on the little white arrow and it will be hiding in there.
With your left mouse click on the center dot. Holding down your left mouse button, move the animation into a spot you like. See my screen shot below for where I placed it.

Time for use to animate.
Standing on the Group 1 layer click the little arrow beside it to expand the group.

Next scroll down until you see layer 1. You will notice a little eyeball on the bottom left corner of Frame 1 and none on Frame 3. The eye means that layer is visible and the others are hidden.

With frame layer one visible, go to Edit>Copy Special>copy merged.

Open Animation Shop.
Go to Edit>Past>As new Animation or Ctrl + V on the keyboard.

**Back to paintshop (psp).
Left click on the eyeball beside layer 1 to hide it and click on the eyeball on layer 3 to make is visible.

With frame layer three visible, go to Edit>Copy Special>copy merged.
Back to animation shop.
Go to Edit>Paste>After current frame or Ctrl + Shift + L on the keyboard.**

If you look on the bottom right corner of Animation shop it will show you how many frames are in the animation. Currently, there is two.

We are going to repeat from ** TO ** until we have 16 frames in animation shop.

Now we have 16 frames in animation shop but we do not know how the animation looks yet.
To view the animation go to View>Animation

or click on the Animiation icon next to the pointer with the ?.

I found the animation to fast and I want to slow this down.
To control the speed of the animation first you need to select all the frames.
Go to Edit>Select all or Ctrl + A on the keyboard.

Next go to Animation>Frame Properties.

When the pop up window appears change the display time to 15 and click ok.

For the display time, the higher the number the slower the animation will be.
You can view your animation again to see the difference.
Time to save the animation.
Go to File>Save As.

When the pop up box shows, find a place to save it on your computer, name the file and the save as type should be gif. See screen shot below.

A new pop up box will appear. I always choose the following. Better Image Quality.

Click on Customize button.
On the Colors tag my settings are 255 Colors, Optimized Octree and Error Diffusion selected.

On the Optimizations tab I have the three center boxes checked and the first and last box unchecked. Click ok.

Click Next, Next, Next and Finished.
You have just completed an animated tag using a psd file.
I hope you have enjoyed my tutorial. I would love to see your results.
Subscribe to:
Posts
(Atom)
My Blinkie
I CT for