My Tag Blog

Favorite Stores
















My Favorite Blogs
























Showing posts with label Elias Chatzoudis. Show all posts
Showing posts with label Elias Chatzoudis. Show all posts
Wednesday, February 7, 2024
Irish Spirit

This tutorial was written by me on February 29, 2016. The results are of my own imagination. Any resemblance to another tutorial is purely coincidental.
Please DO NOT claim this tutorial as your own.
This was written assuming you have working knowledge of PSP.
Please keep in mind that I write the tutorial as I am creating it.
Supplies needed
I am using PSP X6 but this tutorial should work with any version.
Animation shop (Optional)
PTU Tube: I am using a gorgeous tube created by Elias Chatzoudis.
Please do not use his tubes without a proper licence. I purchased mine through PTE.
You can purchase this beauty at CDO here.
FTU Kit: I am using Feeling Lucky by HorsePlay Pastures. You can download this gorgeous kit here.
Mask: Vix St. Paticks Day Mask 2. You can get it here. Just right click on the mask and save to your computer. Open in psps and minimize.
Font of choice for your name
FTU Animation: I am using Sophisticat Simone's awesome St. Patrick's animation 289 which you can get here.
I am using a drop shadow of V/H 3, Opacity 50, blur 5, color black through out the tutorial unless otherwise stated.
Open a new 600x600 transparent image.
Open element 14, copy and close the original. Paste as a new layer and resize 80% all layers not checked.
Using your magic wand with the following settings:

Click inside the frame. Selections - Modify - Expand by 5.
Open paper of choice. I am using paper 13, copy and close the original. Paste as a new layer. Selections - invert and standing on the paper layer, hit delete on your keyboard. Select none. Drop shadow the frame. Move the paper layer under the frame layer.
Copy your main tube and paste as a new layer. Resize 80% and then Adjust - Sharpness - Sharpen. Drop shadow.
Open element 19, copy and close the original. Select the frame layer and paste. Resize 70% and move to the bottom center. See mine for placement. Drop shadow.
Open element 47, copy and close the original. Select the top layer and paste. Resize 70% and move to the bottom center so it looks like your tube is kneeling on the R in spirit. See mine for placement. Drop shadow.
Open element 16, copy and close the original. Select raster 1 and paste. Move to the far right. See mine for placement. Duplicate and mirror.
Open element 45, copy and close the original. Select your tube layer and paste Resize 70% and move under the word art. See mine for placement. Drop shadow.
Open element 29, copy and close the original. Select the scatter layer and paste. Resize 50% and move to the bottom left beside the S in the word art. See mine for placement. Drop shadow.
Open element 30, copy and close the original. Select the tube layer and paste. Resize 50% and move to the far bottom left. See mine for placement. Drop shadow.
Open element 39, copy and close the original. Select the frame layer and paste. Resize 50% and move up and slightly to the right. You should be able to see the wording between the hat and pot of gold on your tube. Drop shadow.
Open element 15, copy and close the original. Select the frame layer and paste. Resize 70% and move to the right (see mine for placement). Duplicate and mirror.
Open element 26, copy and close the original. Select the tube layer and paste. Resize 50%. Adjust - Sharpness - Sharpen. Move to the bottom right in behind the IT and drop shadow.
Open paper of choice. I am using paper 12, copy and close the original. Select raster 1 and paste. Layers - New Mask Layer - From image. In the drop down find Vix St Patty day mask 2 - Source luminance selected - Invert unchecked. Click ok and merge group.
Add your copyright and name. If you are not going to animate, save as png.
Animation:
Select raster 1 and flood fill with white.
Now we need to hide everything from the tube layer and up by clicking on the eye beside each layer.
Edit - Copy Special - Copy merged and paste as new animation in animation shop (ctrl + v)
As Simone's animation has 20 frames we need to have 20 frames for our background that we just pasted. You should still have the background in your memory. Click on your background so it is highlighted. It will have blue around the frame. Hold ctrl + Shift and tap the L 19 times. You should now have 20 frames. You can see how many frames you have in the bottom right corner.
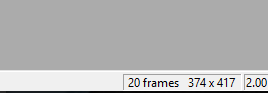

Select Simone's Animation, Select all ctrl + a and copy ctrl + c.
Back to the background animation. Select all ctrl + a and now we need to paste into selected frames ctrl + E. The animation will be hanging off your mouse. Place the animation on top of the pot of gold but on the right side. See screen shot below. Left click when you have it in the spot you want. If you make an error just hit ctrl + z. Now we need the animation on top of the left side of the pot of gold. We are going to repeat the paste into select frames ctrl + e and now place the animation on the left side and left click when happy with placement. See my screen shot below.

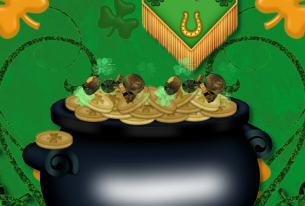


You can close off Simone's animation as we no longer need it.
Back to psp. Close off the open layers by clicking on the eye next to each layer including the white background layer. And make the top layers visible again from the tube layer up by clicking on the eye next to each layer.
Important as we need the animation all the same size. Select all. Edit - Copy special - Copy merged.
Back to animation shop and paste as new animation. ctrl + v. We will need 20 frames so holding down the ctrl + shift tap the L 19 times. You should now have 20 frames.
Select all ctrl + a and copy ctrl + e. Back to the background animation, select all ctrl + a and paste into select frames ctrl + e. Move the top portion of your tag until you find a spot you like then left click.
View your animation by clicking on the film icon next to the arrow with the ?. Once happy with your animation. Save as GIF
Click on save as, name your tag, and the options box will pop up after you click ok. Click in customize and the optimization tab. Only the 3 middle boxes should be selected. Click next, next, next and finished.
I hope you have enjoyed my tutorial. I would love to see your results.
Hugs,
Gwils
Thursday, February 1, 2024
BCA 2023 - PSP

This tutorial was written by me on September 25, 2023. The results are of my own imagination. Any resemblance to another tutorial is purely coincidental.
Please DO NOT claim this tutorial as your own.
This was written assuming you have a working knowledge of PSP.
Please keep in mind that I write the tutorial as I am creating it.
Sometimes I may not explain properly where to place things so please see my example if you are ever in doubt :)
Supplies needed
I am using PSP 2018 but this tutorial should work with any version.
Animation shop (optional)
PTU Tube: I am using Elias Chatzoudis's beautiful tube "59-2". Please do not use this tube without a proper license.
You can purchase this beautiful tube at CDO. CDO is now closed.
FTU Kit: I am using a gorgeous kit called "Awareness-Mini" created by Sophisticat Simone. This gorgeous previous PTU kit, now FTU, can be found at Scrappy Bit of Fun blog here.
FTU Animation: I am using Sophisticat Simone's gorgeous FTU BCA Animations 2023. You can download it from her blog here. I am using ani #3.
Mask: 0078 by Vivienne. Thank you for your awesome masks. You can download it from her blog here. I am using the png versions for this tutorial.
Font of choice for your name. I used a PTU font called Breast Cancer which you can purchase here.
Plug in: None
Drop shadow of choice.
Vivienne's Paintbox has awesome drop shadow settings that I use a lot. You can find the settings here and check out her awesome tutorials :)
Please read all the Artist's/Designer's TOU.
Remember to save often. When resizing an image don't forget to sharpen the layer.
When I state "open an element". I mean Open element ####, copy and paste as a new layer.
Open a new 800x800 transparent image. We will resize later. Flood fill with white.
Open E-046. Resize 92% and move to the upper center of the tag.
Open Vivienne's mask 0078. Copy and paste as a new layer. Resize 75% and mirror it. Position it towards the bottom left. Select all>Float>Defloat and add a new raster layer. Open paper P-003, copy and close the original. Select the new raster layer. Go to Edit>paste into selections. Select none and delete Vivienne's mask.
Open E-048. Resize 31% and move to the top left. Drop shadow.
Open W-001. Resize 129% and move to the top right. Lower the Opacity to 50%.
Open W-002. Resize 92% and move to the top right over the Hope WA.
Open E-045. Resize 49% and move to the top right over the WA. Duplicate and mirror. Move to the left middle of E-046.
Open E-021. Resize 34% and move to the lower right element E-046. Drop shadow.
Open F-004. Resize W: 54% and move to the middle of element E-046. Drop shadow.
Open E-019. Resize 50% and move to the upper left side over the clock. Drop shadow.
Open F-001. Resize 62% and move to the middle of F-004. Using your magic wand, click in the center of the frame. Selections>Modify>expand by 3. Add a new raster layer and drag under the frame.
Open paper P-007. Copy and close the original. Standing on the new raster layer, Edit>Paste into selections and select none. Drop shadow the frame.
Open E-038. Resize 37% and move to the lower left of the flowers.
Duplicate, resize W: 43%. Angle 270.716 degrees. Move to the upper left of the bottom mask. Drop shadow each layer.
Open E-020b. Resize 72% and move to the middle of the frame.
Open W-003. Move to the middle of the frame over the bubbles. Drop shadow.
Open the tube. Copy and paste as a new layer. The sizes might be different as I had purchased mine at Elias's store when he had it open. Resize 67% and move to the left side of the frame. Duplicate this layer. On the duplicate go to Adjust>Blur>Gaussian Blur of 3. Duplicate the blur layer. On the top blur layer, change the blend mode to screen and lower the opacity to 30. Select the bottom blur layer and change the blend mode to Soft Light and lower the opacity to 50. Select the tube layer and apply a drop shadow. I do this when animating a tag as it helps prevent the tube from looking grainy.
Open E-009. Resize 32% and move to the lower middle of the tube. Drop Shadow.
Open E-012b. Resize 20% rotate 20 degrees to the left. Move to the lower left of the tube. Drop shadow.
Open E-001. Resize 12% and move to the lower left of the folder.
Duplicate move to the right of the folder. Drop shadow each layer.
Open E-050. Resize 21% and move to the lower left of the folder.
Duplicate, mirror and move to the right of the tube. See mine for placement. Drop shadow each layer.
Open E-037. Resize 25% and move to the lower middle of the flowers. See mine for placement. Drop shadow.
Open E-034. Resize 22% and move to the lower left of E-037. See mine for placement. Drop shadow.
Open E-003. Resize 22% and move to the lower left of the file. See mine for placement. Drop shadow.
Open E-008. Resize 18% and move to the top left over the clock. Drop shadow.
Open E-002. Resize 18% and move to the lower right of the leaves. Drop shadow.
Open E-027. Resize W: 22% and move to the lower left of the mask. Drop shadow.
Open E-005. Resize 25% and move to the lower right of the tube. Drop shadow.
Open E-035. Resize 25% and move to the lower right of the phone. Drop shadow.
Open E-039. Resize 18% and move to the lower right of the phone. Drop shadow.
Open E-001. Resize 8% and move to the lower right of the hat. Drop shadow.
Open W-004. Resize 65% and move to the over the lower part of the tube and elements. Drop shadow.
Open E-015. Resize 27% and move to the bottom center of the wordart. Drop shadow.
Open E-024. Resize 13% and move to the lower left of the wordart. Drop shadow.
Open E-025. Resize 20% and move to the right of element E-024. Drop shadow.
Add any other elements you like and make any adjustments to the layers.
Crop away any extra space.
Image, Image Size and resize 650 on the longest side.
Add your copyright and name.
If you do not want to animate, hide the white background layer and export as png.
Animation:
Merge all layers from the frame down. Hide this layer. Select the all of the top layer and merge visible. You should now have two layers visible in your layer pallet. The frame and the layer above the frame.
Open Animation Shop.
Open SimoneAni-BCA-2023_03.mng in animation shop.
Select all layers of the animation.
Go to Animation>cull animation. When the window pops up type 2 as we want to remove every second frame which will leave you with 13 frames. Click ok.
Go to Animation>Resize animation by 56% and click ok.
Go back to PSP. Copy your bottom layer (frame layer).
Back to AS.
Paste as a new animation. Now we need 13 frames so holding down the Shift+Ctrl tap the L on your keyboard 12 times. This should give you 13 frames. Select all the frames. Ctrl + A.
Back to Simone's animation. Select all the frames. Ctrl + A and copy the animation Ctrl + C.
Back to your frame animation. All frames selected. Now we need to paste the animation into the selected frames. Ctrl + E and place it in the center of the frame. If you don't like the placement you can always undo by using Ctrl +Z and then retry with Ctrl + E. Once you are happy with the placement of the ani, close Simone's animation but do not save changes.
Back to PSP and copy the top merged layer.
Paste as a new animation. Now we need 13 frames so holding down the Shift+Ctrl tap the L on your keyboard 12 times. This should give you 13 frames. Select all the frames. Ctrl + A.
Back to your frame animation. All frames selected. Now we need to paste the tube layers onto the selected frames. Ctrl + E and place it in the center of the frame. If you don't like the placement you can always undo by using Ctrl +Z and then retry with Ctrl + E.
Select all the frames in animation shop. Go to animation>Frame properties and set it to 15.
Go to file Save as, gif and click next and next until you hit finished. I use the default settings.
I hope you have enjoyed my tutorial. I would love to see your results.
Have Fun!!
BCA 2023

This tutorial was written by me on September 25, 2023. The results are of my own imagination. Any resemblance to another tutorial is purely coincidental.
Please DO NOT claim this tutorial as your own.
This was written assuming you have a working knowledge of PS.
Please keep in mind that I write the tutorial as I am creating it.
Sometimes I may not explain properly where to place things so please see my example if you are ever in doubt :)
Supplies needed
I am using Adobe Photoshop 2023 but this tutorial should work with any version.
You can download the 7 day trial of PS here.
PTU Tube: I am using Elias Chatzoudis's beautiful tube "59-2". Please do not use this tube without a proper license.
You can purchase this beautiful tube at CDO. CDO is now closed.
FTU Kit: I am using a gorgeous kit called "Awareness-Mini" created by Sophisticat Simone. This gorgeous previous PTU kit, now FTU, can be found at Scrappy Bit of Fun blog here.
FTU Animation: I am using Sophisticat Simone's gorgeous FTU BCA Animations 2023. You can download it from her blog here. I am using ani #3.
Mask: 0078 by Vivienne. Thank you for your awesome masks. You can download it from her blog here. I am using the png versions for this tutorial.
Font of choice for your name. I used a PTU font called Breast Cancer which you can purchase here.
Plug in: None
Drop shadow of choice.
Please read all the Artist's/Designer's TOU.
To open an image, I click on the element or paper in the file folder and drag it into PS.
To transfer an element or paper in PS to my tag, I left click and drag it into my working canvas.
The other way is to left click and drag the element from the folder right onto your tag.
Either way you will get the same results :). I will be using the both method for this tutorial.
For resizing and rotating I use the Ctrl+T command.
To mirror or Flip go to Edit, Transform, Flip Horizontal (mirror) or Flip vertical (Flip).
Let's get started.
Remember to save your tag often in case PS crashes. I always save my tags as a psd image. It keeps all the layers and if you make tags for others you will always have the template.
Open a new 800x800 transparent image. We will resize later.
Add a new raster layer.
Go to layers, New fill layer, solid color. When the pop up window appears type in FFFFFF and click ok.
E-046 into the tag. Resize it to W: 91.71 H: 91.71 Click the check mark. Move to the upper center of the tag.
Drag Vivienne's mask 0078 into the tag. Resize and mirror it. I resized mine to W: -29.36 H: 29.33. Click the check mark. Position it towards the bottom left.
Drag paper P-003 into the tag. This resize if a bit different as we want to have it fit over Vivienne's mask. I resized mine W: 23.27 H: 5.38 and hit the check mark. drag it over the mask so the paper covers the entire mask. Once the paper is in place, right click on the paper layer and select Create a clipping mask.
Drag E-048 into the tag. Resize W: 31.09 H: 31.09 and move to the top left.
Drag W-001 into the tag. Resize W: 128.66 H: 128.45 and move to the top right. Lower the Opacity to 50%.
Drag W-002 into the tag. Resize W: 91.99 H: 92.17 and move to the top right over the Hope WA.
Drag E-045 into the tag. Resize W: 49.27 H: 49.27 and move to the top right over the WA. Duplicate and mirror. Move to the left middle of E-046.
Drag E-021 into the tag. Resize W: 33.53 H: 33.53 and move to the lower right element E-046.
Drag F-004 into the tag. Resize W: 53.66 H: 53.66 and move to the middle of element E-046.
Drag E-019 into the tag. Resize W: 18.07 H: 18.07 and move to the upper left over the clock.
Drag F-001 into the tag. Resize W: 62.49 H: 62.19 and move to the middle of F-004.
Drag paper P-007 and move this layer under the frame. Resize W: 15.18 H: 15.18. Move to the middle of the frame.
Select the frame layer. Select your magic wand and click in the center of the frame. Select>Modify>expand by 3 and click ok. Select the paper layer. Go to Layer>Layer Mask>Reveal selection. Select the frame layer again.
Drag E-038 into the tag. Resize W: 37.00 H: 37.00 and move to the lower left of the flowers.
Duplicate, resize W: 18.59 H: 18.59. rotate -76.42 degrees. Move to the upper left of the mask.
Drag E-020b into the tag. Resize W: 72.33 H: 72.33 and move to the middle of the frame.
Drag W-003 into the tag. Resize W: 38.53 H: 38.53 and move to the middle of the frame over the bubbles.
Drag your tube into the tag. The sizes might be different as I had purchased mine at Elias's store when he had it open. Resize W: 67.79 H: 37.790 and move to the left side of the frame. Duplicate, go to Filters>Blur>Gaussian blur set to 3. click ok. Now standing on the blur layer, hold your ctrl key and click on the thumbnail of the original tube layer. This will add marching ants. Now go to Layers>Layer Mask>reveal selection. Duplicate the blur layer one more time. On the top blur change the blend mode to screen and lower the opacity to 30. On the bottom blur layer, change the blend mode to soft light and lower the opacity to 50. I do this when I animate tags as it helps prevent the tube from looking too grainy.
Drag E-009 into the tag. Resize W: 32.73 H: 32.73 and move to the lower middle of the tube.
Drag E-012b into the tag. Resize W: 8.02 H: 8.02 rotate -24.07 degrees. Move to the lower left of the tube.
Drag E-001 into the tag. Resize W: 12.32 H: 11.97 and move to the lower left of the folder.
Duplicate move to the right of the folder.
Drag E-050 into the tag. Resize W: 21.32 H: 21.32 and move to the lower left of the folder.
Duplicate, mirror and move to the right of the tube. See mine for placement.
Drag E-037 into the tag. Resize W: 25.65 H: 25.65 and move to the lower middle of the flowers. See mine for placement.
Drag E-034 into the tag. Resize W: 22.01 H: 22.01 and move to the lower left of E-037. See mine for placement.
Drag E-003 into the tag. Resize W: 22.01 H: 22.88 and move to the left. See mine for placement.
Drag E-008 into the tag. Resize W: 18.54 H: 18.68 and move to the top left over the clock. See mine for placement.
Drag E-002 into the tag. Resize W: 18.93 H: 18.93 and move to the lower right of the leaves. See mine for placement.
Drag E-027 into the tag. Resize W: 22.03 H: 22.24 and move to the lower left of the mask. See mine for placement.
Drag E-005 into the tag. Resize W: 9.91 H: 9.80 and move to the lower right of the tube. See mine for placement.
Drag E-035 into the tag. Resize W: 25.02 H: 25.02 and move to the lower right of the phone. See mine for placement.
Drag E-039 into the tag. Resize W: 31.56 H: 31.35 and move to the lower right of the phone. See mine for placement.
Drag E-001 into the tag. Resize W: 8.43 H: 8.43 and move to the lower right of the hat. See mine for placement.
Drag W-004 into the tag. Resize W: 24.70 H: 24.70 and move to the over the lower part of the tube and elements. See mine for placement.
Drag E-015 into the tag. Resize W: 27.29 H: 27.29 and move to the bottom center of the wordart. See mine for placement.
Drag E-024 into the tag. Resize W: 13.45 H: 13.70 and move to the lower left of the wordart. See mine for placement.
Drag E-025 into the tag. Resize W: 20.13 H: 19.70 and move to the right of element E-024. See mine for placement.
Add any other elements you like and make any adjustments to the layers.
Crop away any extra space.
Image, Image Size and resize 650 on the longest side.
Oh almost forgot we need to drop shadow all of our elements.
Select the E-048 on the bottom of your tag in the layer pallet and double click it.
A layer style window will pop up. Click on Drop shadow. and use the following settings.


Click on the image to make it larger.
Now right click on the layer you just applied the drop shadow. Click copy layer style.
Now click on layer E-021 and hold down the shift key, and select the layer under the paper layer. Right click and paste layer style. Select the frame layer, holding down the shift key, select the top layer. Right click and paste layer style. Drop shadow complete :)
Add your copyright and name.
If you do not want to animate the tag.
Hide the white background layer Save your tag and export as png.
Animation:
Open animation in PS. Select all odd layers by holding down the Ctrl key and clicking on each odd layer. Hit Ctrl + G on your keyboard to group the layers. Select the frame layer on the tag. Now select the ani. Make sure the Auto Select is unchecked on the move tool and drag the animation into the tag. Resize W: 56.45 H: 56.45 and move to the center of the frame. Expand the group folder and hide all animation layers except for layer #1. Close Simone's animation and don't save changes.
Next make sure your Timeline viewer is open on the bottom of PS. I you do not see a row that has Animation (Frames) on the bottom, go to Windows, Timeline.

Next is animating.
Click on the little icon (four white lines) at the right end of the animation screen then select make frames from layers.
You are going to see a big mess in the animation window but we are going to fix this.
Click on the first frame and click on the trash can in the animation window. Repeat this until you reach the first frame of the animation.
Now you should be at the first frame of the animation. Click on frame 14 and hit the trash can. Repeat for all the remaining frames. You should be left with 13 frames in the animation window. This is the amount of frames for our animations.
This next step is very important. Any changes you do from here you must be on frame 1 in the Timeline viewer unless otherwise stated.
Go to the bottom of your tag in the layers pallet. Make sure you have animation frame 1 selected.
Click on the eyeball beside each layer to make it visible. Do not touch the group layer and do not make any of the second animation visible.
Next, I want to slow down the animation. With the first frame selected, hold down the shift key and click on frame 13. This will select all the frames.
Next, click on the little black arrow beside the 0 sec as we want to change the speed. A pop up window will appear.

I selected 0.2 Sec. Now click on the play button to view the animation. Click on it again to stop it.
Click frame 1 again so we don't accidentally make any changes.
Now to save our tag as a gif.
Go to File>Export>Save for Web(Legacy).
A new pop up window will appear. Change the settings to my screen shot below. Click on the image to enlarge it if needed. Click save. My screen shot will look different but the settings are the same.

Click on the image to make it larger.
I hope you have enjoyed my tutorial. I would love to see your results.
Subscribe to:
Posts
(Atom)
My Blinkie
I CT for