My Tag Blog

Favorite Stores


My Favorite Blogs


New tutorial blog
A Steampunk Winter


I do this everytime I open Animation Shop.
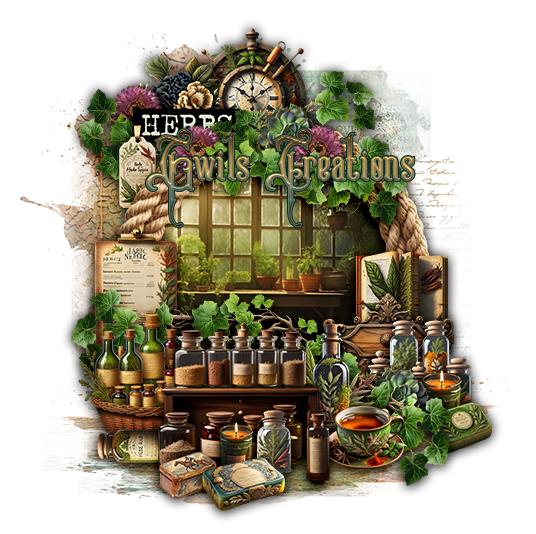
Dad's Garage 3

This tutorial was written by me on June 12, 2024. The
results are of my own imagination. Any resemblance to another tutorial is
purely coincidental.
Please DO NOT claim this tutorial as your own.
This was written assuming you have a working knowledge of
PSP.
Please keep in mind that I write the tutorial as I am
creating it.
Sometimes I may not explain properly where to place things
so please see my example if you are ever in doubt :)
Supplies needed
I am using PSP 2018 but this tutorial should work with any
version.
PTU Kit: I am using a fabulous kit called "Dad’s
Garage 3" created by Carita Creationz. It contains 60 unique
elements (incl. 7 frames), 1 tube and 10 papers. You can purchase the kit
here.
Mask: Mask 92 by Vivienne's Paintbox. Thank you for your awesome masks. You can download it from her blog here. I am using the png versions for this tutorial.
Font of choice for your name.
Plug in: None
Drop shadow of choice. I am using Vertical 0,
Horizontal 3, Opacity 75, Blur 10, color black.
I use Vivienne’s drop shadows quite a bit as I really like
the look of her shadows. Thank you for letting me use your settings for
my tutorials.
Please read all the Artist's/Designer's TOU.
An image can get blurred when you resize an element or tube
in PSP. I use unsharpen mask for each item. Vivienne has wonderful
tips and tricks on how to do this here.
Please read all the Artist's/Designer's TOU.
Let’s get started.
Open a new 800x800 transparent image. We will resize
later. Flood fill with white.
Remember to sharpen and drop shadow each image as you create
the tag.
Mask_Vivienne_0092 – Move to the top center of the tag. Select all, float, defloat. Add a new raster layer. Open paper of choice. I am using pp01. Copy the paper, standing on the new raster
layer, go to Edit, paste into selections.
Select none and delete Vivienne’s original mask layer.
Element 16 – Resize 60% and move to the bottom of the top
left of the mask. Select the mask
layer. Select all, float, defloat. Select element 16 layer, selections invert
and hit delete on your keyboard a couple times.
Select none.
Element 05 – Resize 15% and move to the top of element
16. Drop shadow.
Element 50 – Resize 10% and move to the lower left of
element 16. Drop shadow.
Element 37 – Resize 15% and move to the lower right of the
mask. Drop shadow.
Element 39 – Resize 33% and move to the top right of the
mask. Drop shadow.
Element 03 – Resize 40% and move to the bottom of element 39. Drop shadow.
Element 25 – Resize 20% and move to the lower right of
element 03. Drop shadow.
Element 07 – Resize 70% and move to the lower left of the
mask. Drop shadow.
Element 31 – Resize 12% and move to the top of the
headlight. Drop shadow.
Element 30 – Resize 15% and move to the bottom left of the
truck. Drop shadow.
Element 15 – Resize 15% and move to the bottom left of
element 30. Drop shadow.
Element 46 – Resize 10% and move to the top of element
15. Drop shadow.
Element 26 – Resize 15% and move to the bottom of the truck
by the front tire. Drop shadow.
Element 47 – Resize 7% and move to the bottom left of
element 26. Drop shadow.
Element 32 – Resize 13% and move to the bottom of element
26. Drop shadow.
Element 20 – Resize 30% and move to the bottom right of element
07. Drop shadow.
Element 27 – Resize 17% and move to the bottom left of
element 20. Drop shadow.
Element 21 – Resize 13% and move to the bottom right of
element 20. Drop shadow.
Element 34 – Resize 10% and move to the bottom lower right
of element 27. Drop shadow.
Element 23 – Resize 10% and move to the bottom left of
element 34. Drop shadow.
Tube - Resize 40% and move to the left of element 20. Drop
shadow.
Element 38 – Resize 20% and move to the bottom of the
tube. Drop shadow.
Element 13 – Resize 5% and move to the upper left of element
38. Drop shadow.
Element 52 – Resize 10% and move to the upper right of
element 38. Drop shadow.
Element 08 – Resize 6% and move to the top left of element
52. Drop shadow.
Element 49 – Resize 7% and move to the bottom left of
element 52. Drop shadow.
Element 45 – Resize 13% and move to the bottom left of
element 49. Drop shadow.
Element 06 – Resize 10% and move to the bottom left of
element 45. Drop shadow.
Element 09 – Resize 18% and move to the bottom right of
element 52. Drop shadow.
Element 43 – Resize 10% and move to the left of element
09. Drop shadow.
Element 18 – Resize 7% and move to the bottom left of
element 43. Drop shadow.
Element 12 – Resize 5% and move to the bottom left of
element 18. Drop shadow.
Element 10 – Resize 8% and move to the bottom of the bottle
case. Drop shadow.
Add any other elements you would like on the tag.
Crop and resize your tag. I resize mine to 650px on
the width (if needed) as that is what fits my blog best.
Add your name and copyright.
Hide the white background and save as png.
I hope you have enjoyed my tutorial. I would love to
see your results.
My Garden

This tutorial was written by me on June 3, 2024. The results
are of my own imagination. Any resemblance to another tutorial is purely
coincidental.
Please DO NOT claim this tutorial as your own.
This was written assuming you have a working knowledge of
PSP.
Please keep in mind that I write the tutorial as I am
creating it.
Sometimes I may not explain properly where to place things
so please see my example if you are ever in doubt :)
Supplies needed
I am using PSP 2018 but this tutorial should work with any
version.
PTU Kit: I am using a gorgeous matching kit called
"My Garden" created by Carita Creationz. This kit contains 60
unique elements, 1 cluster and 15 papers.
Please note that the tube is not included. You can purchase the
kit here.
PTU Tube: I am using a beautiful tube called "Joyce" created by Vi Nina. Please do not use this tube without a proper license.
You can purchase this tube at Vi Nina Tubes store here.
Mask: Mask 24 by Vivienne's Paintbox. Thank you for your awesome masks. You can download it from her blog here. I am using the jpg versions for this tutorial. Open mirror and minimize in PSP.
Font of choice for your name.
Plug in: None
Drop shadow of choice. I am using Vertical 0,
Horizontal 3, Opacity 65, Blur 10, color black.
I use Vivienne’s drop shadows quite a bit as I really like
the look of her shadows. Thank you for letting me use your settings for
my tutorials.
Please read all the Artist's/Designer's TOU.
An image can get blurred when you resize an element or tube
in PSP. I use unsharpen mask for each
item. Vivienne has wonderful tips and
tricks on how to do this here.
Please read all the Artist's/Designer's TOU.
Let’s get started.
Open a new 800x800 transparent
image. We will resize later. Flood
fill with white.
Remember to sharpen and drop shadow each image as you create
the tag.
Mask_Vivienne_0092 – Resize 80% and move to the top left of
the tag. Select all, float,
defloat. Add a new raster layer. Open paper of choice. I am using paper 3. Copy the paper, standing on the new raster
layer, go to Edit, paste into selections.
Select none and delete Vivienne’s original mask layer.
Element 10 – Resize 40%, move to the upper right of the mask
and drop shadow.
Element 8 – Resize 44%, move to the lower left of element 10
and drop shadow.
Element 17 – Resize 15%, move to the lower right of element 10
and drop shadow.
Element 11 – Resize 13%, move to the lower right of element 17
and drop shadow.
Element 12 – Resize 10%, move to the lower left of element
11 and drop shadow.
Element 53 – Resize 28%, move to the top right of element 8
and drop shadow.
Element 43 – Resize 10%, move to the bottom right of element
8 and drop shadow.
Element 4 – Resize 35%, move to the bottom of element 12 and
drop shadow. See my example placement.
Vi Nina’s tube - Resize 25%, move between element 4 and
element 8. Drop shadow.
Element 01 – Resize 10%, move to the bottom right of the
tube and drop shadow.
Element 05 – Resize 27%, move to the bottom left of element
8 and drop shadow.
Element 02 – Resize 15%, move to the bottom right of element
8 and drop shadow.
Element 18 – Resize 15%, move to the bottom right of the
tube and drop shadow.
Element 16 – Resize 10%, move to the bottom left of element
18 and drop shadow.
Element 37 – Resize 15%, move to the bottom left of the tube
and drop shadow.
Element 21 – Resize 12%, move to the bottom right of element
02 and drop shadow.
Element 40 – Resize 10%, move to the bottom right of element
37 and drop shadow.
Element 30 – Resize 10%, move to the bottom right of element
21 and drop shadow.
Element 32 – Resize 5%, move to the bottom left of element
30 and drop shadow.
Element 28 – Resize 7%, move to the bottom right of element
30 and drop shadow.
Element 15 – Resize 12%, mirror and move to the bottom right
of the pail. Drop shadow.
Element 51 – Resize 15%, move to the bottom left of the pail
and drop shadow.
Element 14 – Resize 10%, move to the bottom of element 51
and drop shadow.
Element 39 – Resize 5%, free rotate to the right 15 degrees.
Move to right middle of element 10.
Duplicate, mirror and move to the top of element 8. Drop shadow each layer.
Element 58 – Resize 10%, move to the bottom left of the
lantern and drop shadow.
Add any other elements you would like on the tag.
Crop and resize your tag.
I resize mine to 650px on the width (if needed) as that is what fits my
blog best.
Add your name and copyright.
Hide the white background and save as png.
I hope you have enjoyed my tutorial. I would love to see your results.
Mermaid Kit 16

This tutorial was written by me on June 2, 2024. The results
are of my own imagination. Any resemblance to another tutorial is purely
coincidental.
Please DO NOT claim this tutorial as your own.
This was written assuming you have a working knowledge of
PSP.
Please keep in mind that I write the tutorial as I am
creating it.
Sometimes I may not explain properly where to place things
so please see my example if you are ever in doubt :)
Supplies needed
I am using PSP 2018, but this tutorial should work with any
version.
PTU Kit: I am using a gorgeous kit called "Mermaid Kit 16" created by Luna Bella. This kit contains 2 dolls AI generate by Tamara Scrap Vision, 74 elements and 10 papers. You can purchase the kit here.
Mask: Mask: Mask_Vivienne_0092 by Vivienne. Thank you for your awesome masks. You can download it from her blog here. I am using the png versions for this tutorial.
Font of choice for your name.
Plug in: None
Drop shadow of choice.
Drop shadow of choice. I am using Vertical 0,
Horizontal 3, Opacity 65, Blur 10, color black.
I use Vivienne’s drop shadows quite a bit as I really like
the look of her shadows. Thank you for letting me use your settings for
my tutorials.
Please read all the Artist's/Designer's TOU.
An image can get blurred when you resize an element or tube
in PSP. I use unsharpen mask for each
item. Vivienne has wonderful tips and
tricks on how to do this here.
Please read all the Artist's/Designer's TOU.
Let’s get started.
Open a new 800x800 transparent
image. We will resize later. Flood
fill with white.
Remember to sharpen and drop shadow each image as you create
the tag.
EL 28 – Resize 30%, mirror and move to the upper right of
the tag. Drop shadow.
EL 19 – Drag this layer under element 28 layer and move
under the ship.
EL 60 – Resize 20% and move to the top left of the ship. Drop shadow.
EL 47 – Resize 20%.
Drag this layer under EL 60 layer and move to the top right of EL
60. Drop shadow.
Select the white flood fill layer.
Mask_Vivienne_0092 – Resize 83% and move to the top left of
the tag. Select all, float,
defloat. Add a new raster layer. Open paper of choice. I am using paper 5. Copy the paper, standing on the new raster
layer, go to Edit, paste into selections.
Select none and delete Vivienne’s original mask layer.
El 41 – Resize 55% and move to the top right so it is under
the ship and sand.
EL 4 – Resize 50%, mirror and move to the top left of EL 41. Drop shadow.
Select EL 19 layer.
AI EL 3 – Resize 50% and move to the lower left of EL 4. Drop shadow.
EL 64 – Resize 15% and move to the upper right of the
mask. Drop shadow.
Select the ship layer.
EL 4 – Resize 20% and move to the bottom left of the ship. Drop shadow.
El 22 – Resize 15% and move to the bottom left of the
ship. Drop shadow.
El 5 – Resize 10% and move to the bottom right of the
ship. Drop shadow.
El 57 – Resize 20% and move to the bottom of the ship
between EL 22 and EL 5. Drop shadow.
El 15 – Resize 7% and move to the bottom right of the rocks. Drop shadow.
El 9 – Resize 10% and move to the top left of the rocks. Drop shadow.
El 3 – Resize 40% and move to the top left of the mask. Drop shadow.
EL 18 – Resize 40% and move to the left of EL 3. Drop shadow.
EL 22 – Resize 40% and move to the bottom left of EL 19. Drop shadow.
EL 32 – Resize 20% and move to the lower left of EL 22. Drop shadow.
EL 33 – Resize 15% and move to the lower left of EL 32. Drop shadow.
AI EL 7 – Resize 15%, mirror and move to over element 3. Drop shadow.
AI EL 4 – Resize 50% move to the bottom left of EL 3. Drop shadow.
AI EL 6 – Resize 80% and move to the over to the top left of
the tag. Drop shadow.
El 7 – Resize 40%. Move
to the bottom left of AI EL 4. Drop
shadow.
EL 13 – Resize 15%, mirror and move to the lower left of EL 7. Drop shadow.
Tube (2) – Resize 20% and move to the bottom of the tag so
her hair covers the bottom of EL 3. Drop
shadow.
El 7 – Resize 40%.
Drag this layer under the tube layer and move to the bottom left of the
tube. Drop shadow.
EL 60 – Resize 30% and move to the lower right of element 7. Drop shadow.
EL 46 – Resize 15% and move to the bottom left of element 60. Drop shadow.
EL 13 – Resize 15% and move to the bottom left of element 7. Drop shadow.
EL 61 – Resize 20% and move to the far right of element 7. Drop shadow.
EL 26 – Resize 20% and move to the right of element 61. Drop shadow.
EL 16 – Resize 15% and move to the far right of the bottom
right of element 16. Drop shadow.
EL 25 – Resize 15% and move to the bottom of EL 16. Drop shadow.
Select the tube layer.
EL 59 – Resize 20% and move to the lower left of the tube. Drop shadow.
AI EL 2 – Resize 20% and move to the bottom left of the tube. Drop shadow.
EL 38 – Resize 15% and move to the bottom center of the tube. Drop shadow.
EL 48 – Resize 5% and move to the bottom right of AI EL 2. Drop shadow.
EL 2 – Resize 10% and move to the bottom left of EL 38. Drop shadow.
AI EL 1 – Resize 10% and move to the bottom left of AI EL 2. Drop shadow.
EL 39 – Resize 15% and move to the bottom right of the tube. Drop shadow.
EL 53 – Resize 10% and move to the upper left of element 39. Drop shadow.
Select EL 19 and duplicate.
Move to the upper right of the tube.
Duplicate and move to the lower right of the tube. Duplicate one more time, flip and move to the
upper right of the tube.
Add any other elements you would like on the tag.
Crop and resize your tag. I resize mine to 650px on
the width (if needed) as that is what fits my blog best.
Add your name and copyright.
Hide the white background and save as png.
I hope you have enjoyed my tutorial. I would love to
see your results.
Behind the mask

This tutorial was written by me on May 30, 2024. The results
are of my own imagination. Any resemblance to another tutorial is purely
coincidental.
Please DO NOT claim this tutorial as your own.
This was written assuming you have a working knowledge of
PSP.
Please keep in mind that I write the tutorial as I am
creating it.
Sometimes I may not explain properly where to place things
so please see my example if you are ever in doubt :)
Supplies needed
I am using PSP 2018 but this tutorial should work with any
version.
PTU Tube: I am using a gorgeous multi layered tube called “Inessa” by Lady Sky. You can purchase her beautiful tubes at VM Artists here.
PTU Kit: I am using a gorgeous matching kit called "Behind the Mask" created by Curious Creative Dreams. You can purchase the kit here.
Mask: Mask_Vivienne_0092 by Vivienne. Thank you for your awesome masks. You can download it from her blog here. I am using the png versions for this tutorial.
Font of choice for your name.
Plug in: None
Drop shadow of choice. I am using Vertical 0,
Horizontal 3, Opacity 85, Blur 10, color black.
An image can get blurred when you resize an element or tube
in PSP. I use unsharpen mask for each
item. Vivienne has wonderful tips and
tricks on how to do this here.
Please read all the Artist's/Designer's TOU.
Let’s get started.
Open a new 800x800 transparent
image. We will resize later. Flood
fill with white.
Remember to sharpen and drop shadow each image as you create
the tag.
Copy and paste Vivienne’s mask in PSP. Resize 80%.
Select all, float, defloat and add a new raster layer. Copy paper of choice. I am using paper 15. Standing on the new raster layer, paste into
selections. Select none and delete the
original mask layer. Move the mask to
the top center of the tag. Duplicate the
mask. Mirror and resize 80%. Drag this layer under the first mask layer
and move to the bottom of the tag.
Frame 1 – Resize 40% and move to the upper right of the
large mask. Using the magic wand, click
in the center of the frame. Selections,
modify, expand by 5. Add a new raster
layer and drag this under the frame layer.
Copy paper of choice. I am using
paper 16. Select the new raster layer
and paste into selections. Deselect and
drop shadow the frame.
Element 24 – Resize 20% and move to the top left of the
frame. Drop shadow.
Element 23 – Resize 30% and move to the lower right of element
24. Drop shadow.
Element 13 – Resize 20% and move to the bottom right of the
house. Drop shadow.
Element 79 – Resize 15% and move to the lower left of the
house. Drop shadow.
Element 57 – Resize 55% and move to the bottom left of the
mask. Drop shadow.
Element 32 – Resize 10% and move to the lower left of the
chair. Drop shadow.
Element 6 – Resize 10% and move to the lower left of the
chair. Drop shadow.
Element 33 – Resize 10% and move to the lower right of the leaves. Drop shadow.
Element 3 – Resize 10% and move to the lower right of the
candle. Drop shadow.
Element 72 – Resize 20% and move to the lower right of the
chair. Drop shadow.
Element 62 – Resize 15% and move to the lower left of the
smaller mask. Drop shadow.
Element 55 – Resize 10% and move to the lower right of the doll. Drop shadow.
Element 88 – Resize 6% and move to the lower left of the
bowl. Drop shadow.
Element 15 – Resize 5% and move to the lower right of the
bowl. Drop shadow.
Element 56 – Resize 6%, mirror and move to the lower right
of the flower. Drop shadow.
Tube: Resize 10% and
drop shadow. Move to the lower center of
the tag.
Element 54 – Resize 12% and move to the bottom of the
tube. Drop shadow.
Element 41 – Resize 7% and move to the lower left of the
tube by the girl doll. Drop shadow.
Element 65 – Resize 10% and move to the lower left of the
tube. Drop shadow.
Element 29 – Resize 8% and move to the lower right of the
bowl. Drop shadow.
Element 84 – Resize 5% and move to the bottom of the
mask. Drop shadow.
Element 40 – Resize 7% and move to the bottom of the
bird. Drop shadow.
Element 10 – Resize 10% and move to the lower left of the
mask. Drop shadow.
Crop and resize your tag. I resize mine to 650px on
the width (if needed) as that is what fits my blog best.
Add your name and copyright.
Hide the white background and save as png.
I hope you have enjoyed my tutorial. I would love to
see your results.
Space Kingdom

This tutorial was written by me on May 29, 2024. The results
are of my own imagination. Any resemblance to another tutorial is purely
coincidental.
Please DO NOT claim this tutorial as your own.
This was written assuming you have a working knowledge of
PSP.
Please keep in mind that I write the tutorial as I am
creating it.
Sometimes I may not explain properly where to place things
so please see my example if you are ever in doubt :)
Supplies needed
I am using PSP 2018 but this tutorial should work with any
version.
PTU Kit: I am using a super fun kit called "Space Kingdom" created by Blu Moon Designs. You can purchase the kit here.
Mask: MIZ_Mask_383 by Mizteeques. Thank you for your awesome masks. You can download it from her blog here. I am using the jpg versions for this tutorial. Open in PSP and minimize.
Font of choice for your name.
Plug in: DSB Flux - Linear Transmission.
Drop shadow of choice. I am using Vertical 0,
Horizontal 3, Opacity 75, Blur 10, color black.
An image can get blurred when you resize an element or tube
in PSP. I use unsharpen mask for each
item. Vivienne has wonderful tips and
tricks on how to do this here.
Please read all the Artist's/Designer's TOU.
Let’s get started.
Open a new 800x800 transparent
image. We will resize later. Flood
fill with white.
Remember to sharpen and drop shadow each image as you create
the tag.
Copy and paste AI-pp 12.
Resize 80% and apply Mizteeques mask.
Merge group and resize 85%, and again by 70%. flip and mirror the
mask. Move up slightly. Erase the hard
line on the top of the mask using the
eraser tool with the hardness set to 50. Duplicate and flip. Move to the lower left of the first mask. Apply DSB Flux Linear Transmissions to each
mask with the following setting:

Then go to Adjust, add noise and apply the following
settings to each mask.

AI-EL 6, Resize 40%, mirror and move to the top right of the
mask. Change the blend mode to soft
light.
AI El 10 – Resize 15%, rotate 10 degrees to the right and
move to the top left of AI-EL 6. Drop Shadow.
AI El 12 – Resize 15%, mirror and move to the lower left of
AI-EL 26. Drop Shadow.
BM-SpaceKindom-EL – Resize 30% and move to the lower right
of AI-EL6. Duplicate, flip and move to
the upper left of the planet.
AI El 26 – Resize 40%.
Move to the left of the planet. Drop Shadow.
AI-EL 25, Resize 20%, and move to the lower left of AI-EL
26. Drop shadow.
AI-EL 8, Resize 20%, and move to the lower right of AI-EL
25. Drop shadow.
AI-EL 28, Resize 40%, and move to the lower right of the
planet. Drop shadow.
AI-EL 19, Resize 25%, and move to the lower right of AI-EL
28. Drop shadow.
AI-EL 18, Resize 25%, and move to the bottom right of AI-EL
28. Drop shadow.
AI-EL 9, Resize 15%, and move to the lower right of AI-EL 19. Drop shadow.
AI El 27 – Resize 60% and move to the left of AI-EL 28. Drop
Shadow.
AI El 20 – Resize 25% and move to the bottom right AI-EL 27.
Drop Shadow.
AI El 13 – Resize 15% and move to the bottom of AI-EL 20 by
the lower yellow edge. Drop Shadow.
AI El 24 – Resize 15%, mirror and move to the bottom left
AI-EL 27. Drop Shadow.
AI El 17 – Resize 10% and move to the bottom left AI-EL 31.
Drop Shadow.
AI El 31 – Resize 45% and move to the bottom right of AI-EL
27. Drop Shadow.
AI El 14 – Resize 15%, mirror and move to the bottom left
AI-EL 31. Drop Shadow.
AI El 19 – Resize 15%, mirror and move to the bottom of
AI-EL 31. Drop Shadow.
AI El 11 – Resize 15% and move to the bottom right AI-EL 14.
Drop Shadow.
Add any other elements that you would like on your tag.
Select the second mask.
Using your eraser tool, hardness set to 100. Erase the bottom part that is sticking out
from the bottom of the tag.
Crop and resize your tag. I resize mine to 650px on
the width (if needed) as that is what fits my blog best.
Add your name and copyright.
Hide the white background and save as png.
I hope you have enjoyed my tutorial. I would love to
see your results.
My Blinkie

I CT for


