My Tag Blog

Favorite Stores










My Favorite Blogs












Showing posts with label Karmalized Scraps. Show all posts
Showing posts with label Karmalized Scraps. Show all posts
Wednesday, February 7, 2024
FTU: Recover

This tutorial was written by me on April 18, 2020. The results are of my own imagination. Any resemblance to another tutorial is purely coincidental.
Please DO NOT claim this tutorial as your own.
This was written assuming you have a working knowledge of PSP.
Please keep in mind that I write the tutorial as I am creating it.
Sometimes I may not explain properly where to place things so please see my example if you are ever in doubt :)
Supplies needed
I am using PSP 2018 but this tutorial should work with any version.
PTU Tube: I am using a beautiful tube by Nocturne called "Earthday". Please do not use this tubes without a proper license.
You can purchase this tube at PFD here.
FTU Kit: I am using a beautiful kit called "Recover" created by Karmalized Scraps. You can download the kit from her blog here. Thank you Ashley for this gorgeous kit.
Masks: Mask 324 by Mizteeques. You can grab them here. You will need the png version for this tutorial. Open and minimize in psp.
FTU Font Historic Seattle. You can download it from dafont here.
Plug in: Eyecandy 4000 - Gradient glow.
Drop shadow of choice.
Vivienne's Paintbox has awesome drop shadow settings that I use a lot. You can find the settings here and check out her awesome tutorials :)
Let's get started.
Open a new 800x800 transparent image. We will resize later.
Add a new layer and flood fill with white.
Select raster 1, copy Misteeque's mask, edit>paste as a new layer. Select all, float, defloat and and a new raster layer. You can close the mask now as we no longer need it.
Open paper of choice. I am using paper 6, copy, back to the new raster layer, edit, paste into selections. Select none and delete the original mask layer.
Copy your tube and paste as a new layer. Image, resize 35%, all layers not checked and move to the lower right corner of the mask. Drop shadow.
Open element 44, copy and close the original. Select the mask layer and paste. Resize 40% and move to the upper left of the mask. Drop shadow.
Open element 31, copy and close the original. Select the mask layer and paste. Resize 40% and move to the middle right. Duplicate and mirror. Move this layer to the upper left. Drop shadow each layer.
Open element 27, copy and close the original. Select the stair way layer and paste. Resize 40% and move behind the tube to the left.
Drop shadow.
Open element 37, copy and close the original. Select the pillar layer and paste. Resize 40% and move to the bottom left so it covers the bottom of the pillar. Drop shadow.
Open element 47, copy and close the original. Select the top tree layer and paste. Resize 15% and move up so it is in the middle of the arch. Drop shadow.
Open element 12, copy and close the original. Select the owl layer and paste. Resize 20% and move to the bottom of the archway. Drop shadow.
Open element 15, copy and close the original. Select the stairway layer and paste. Resize 25% and move to the bottom left of the stairway. Drop shadow.
Open element 26, copy and close the original. Select the stone angel layer and paste. Resize 15% and mirror. Move to the upper right corner of the mask and drop shadow.
Open element 50, copy and close the original. Select the bottom tree layer and paste. Resize 40% and move to the far upper left of the tag. Drop shadow.
Open element 37 again, copy and close the original. Select the clock layer and paste. Resize 40% and again by 90%. Mirror and move to the bottom of the clock. Drop shadow.
Open element 33, copy and close the original. Select the clock layer and paste. Resize 15% and move to the bottom left of the clock. Drop shadow.
Open element 34, copy and close the original. Select the leaf layer and paste. Resize 15% and move to the bottom right of the clock. Drop shadow.
Open element 21, copy and close the original. Select the top leaf layer and paste. Resize 20% and move to the left so it is over the clock. Drop shadow.
Open element 22, copy and close the original. Select the top angel and paste. Resize 30% and move to the bottom left. Drop shadow.
Open element 20, copy and close the original. Select the tube layer and paste. Resize 20%, image, free rotate to the right by 20 degrees. Move to the bottom left corner of the tube and drop shadow.
Open element 17, copy and close the original. Select the heart layer and paste. Resize 20% and move to the bottom so it is in front of the heart. Drop shadow.
Open element 24, copy and close the original. Select the heart layer and paste. Resize 15% and resize again by 80 mirror. Move to the far bottom left of the heart. Drop shadow.
Open element 23, copy and close the original. Select the mask layer and paste. Resize 15% and move to the bottom left so it is slightly over the mask. Drop shadow.
Open element 25, copy and close the original. Select the top clock layer and paste. Resize 12% and move to the bottom of the clock. Drop shadow.
Open element 53, copy and close the original. Select the heart layer and paste. Resize 30% and move to the bottom center of the tube. Drop shadow.
Open element 38, copy and close the original. Select the heart layer and paste. Resize 30% and move to the bottom left just over the heart. Drop shadow.
Open element 39, copy and close the original. Select the heart layer and paste. Resize 25% and mirror. Move to the bottom left of the tube. Drop shadow.
Open Spray 2, copy and close the original. Select the tube layer and paste. Resize 30% and move to the bottom of the tube and slightly to the right. Drop shadow.
Open wordart 2, copy and close the original. Select the bubble layer and paste. Resize 20% and again by 70%. Move to the middle left.
Duplicate this layer. One the bottom layer, using your manual color correction change the source to white and target color #d2b1bb. Click o and repeat. Using your pick tool, click the left arrow on your keyboard x3 and up x3. Add a gradient glow, basic tab 5, color tab click on medium. click ok. Click on the top word art layer and apply the following drop shadow. V 0, H -2, Opacity 50, blur 2 color black. While standing on the top wordart layer, merge down. Repeat the gradient glow but change the color to #dfc7cc. Resize the wordart by another 80%.
Add any other elements you like.
Hide the white layer and merge visable.
Image, resize by 600 pixels on the longest side, all layers checked.
Adjust sharpness, Unsharpen mask, radius and clipping set to 5 and strength set to 30. Click ok.
Add your copyright and name.
Save as png.
I hope you have enjoyed my tutorial. I would love to see your results.
Have Fun!!

FTU: Insoluble Mystery
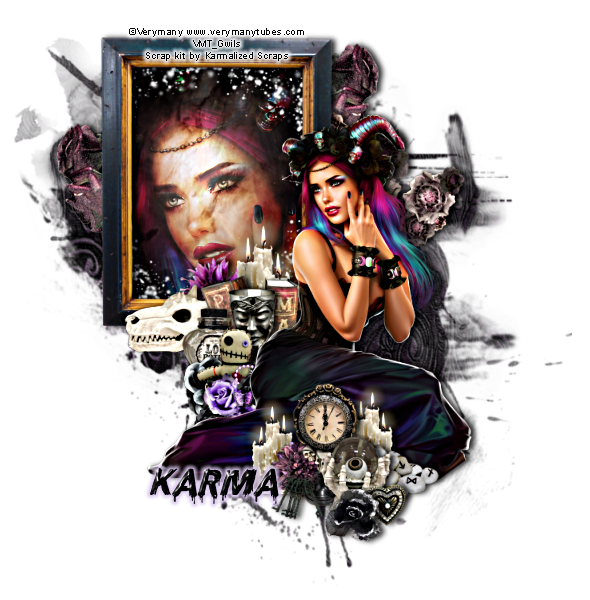
This tutorial was written by me on April 24, 2020. The results are of my own imagination. Any resemblance to another tutorial is purely coincidental.
Please DO NOT claim this tutorial as your own.
This was written assuming you have a working knowledge of PSP.
Please keep in mind that I write the tutorial as I am creating it.
Sometimes I may not explain properly where to place things so please see my example if you are ever in doubt :)
Supplies needed
I am using PSP 2018 but this tutorial should work with any version.
PTU Tube: I am using a beautiful tube by Verymany called "Insoluble Mystery". Please do not use this tubes without a proper license.
You can purchase this tube at Verymany's store here.
FTU Kit: I am using a beautiful kit called "Mini 1" created by Karmalized Scraps. You can download the kit from her blog here.
Masks: Mask 79 by Vivienne. You can grab it on her blog here. Open and minimize in psp. I am using the jpg version for this tutorial.
Font of choice for you name.
Plug in: none.
Drop shadow of choice.
Vivienne's Paintbox has awesome drop shadow settings that I use a lot. You can find the settings here and check out her awesome tutorials :)
I sharpen each layer as I go along. My settings are as follows:
Adjust sharpness, Unsharpen mask, radius and clipping set to 5 and strength set to 30. Click ok.
Let's get started.
Open a new 800x800 transparent image. We will resize later.
Add a new layer and flood fill with white.
Select raster 1, Open paper of choice. I am using paper 1, copy and paste as a new layer. Layers, new mask layer, from image and in the drop down select Mask 79 and click ok. Merge group. Resize 90% all layers not checked. You can close the mask as we no longer need it :)
Copy your tube and paste as a new layer. Image, resize 40%, all layers not checked. Drop shadow. Don't forget to unsharpen mask.
Open Frame 1, copy and close the original. Select the mask layer and paste. Resize 50% and move to the upper left corner of the mask. Using your magic wand, click in the center of the frame. Selections, modify, expand by 5. Open paper of choice. I am using paper 2, copy and close the original. Select the mask layer and add a new raster layer. Standing on the new layer, edit, paste into selections. Deselect. Copy your close up tube. Standing on your paper layer, paste. Resize 50%, don't forget to unsharpen mask, and move into the frame. Once happy with the placement, select the paper layer, using your magic wand, click on the outside of the paper. Select the close up layer and hit delete on your keyboard. Select none. Change the blend mode on the close up to Hard light and lower the opacity to 60%. Drop shadow the frame. Open spray 1, copy and close the original. Select the close up layer and paste. Resize 60% and move into the frame. Once happy with placement, select the close up layer, using your magic wand, click on the outside of the tube. Select the spray layer and hit delete on your keyboard. Select none and drop shadow.
Open element 24, copy and close the original. Select the mask layer and paste. Resize 40% and move to the upper right of the frame. Duplicate and mirror. Move to the left of the frame about half way. Drop shadow each layer.
Open element 23, copy and close the original. Select the top rose layer and paste. Resize 40% and move to the far right of the frame about half way down. Drop shadow.
Open element 3, copy and close the original. Select the frame layer and paste. Resize 20% and move to the bottom right of the frame. Drop shadow.
Open element 8, copy and close the original. Select the frame layer and paste. Resize 20% and move behind the books. Drop shadow.
Open element 21, copy and close the original. Select the frame layer and paste. Resize 20% and again by 80%. Move to the top left of the books. Drop shadow.
Open element 18, copy and close the original. Select the purple flower layer and paste. Resize 18% and mirror. Move to the bottom left of the frame. Drop shadow.
Open element 2, copy and close the original. Select the book layer and paste. Resize 20% and move to the bottom left of the books. Drop shadow.
Open element 6, copy and close the original. Select the book layer and paste. Resize 18% and move to the center of the books. Drop shadow.
Open element 16, copy and close the original. Select the potion layer and paste. Resize 15% and move to the bottom of the potion. Drop shadow.
Open element 22, copy and close the original. Select the potion layer and paste. Resize 15% and move to the bottom left of the potion. Drop shadow.
Open element 26, copy and close the original, select the doll layer and paste. Resize 20% and mirror. Move to the bottom of the doll and drop shadow.
Open element 12, copy and close the original. Select the main tube layer and paste. Resize 20% and move to the bottom of the tube about mid way of the skirt. Drop shadow.
Open element 11, copy and close the original. Select the clock layer and paste. Resize 18% and move to the bottom of the clock slightly to the right. Drop shadow.
Open element 7, copy and close the original. Select the tube layer and paste. Resize 18% and move to the bottom of the skirt towards the left.
Open element 28, copy and close the original. Select the stone layer and paste. Resize 15% and move to the bottom left of the clock. Drop shadow.
Open element 1, copy and close the original. Select the clock layer and paste. Resize 10% and move to the bottom left of the clock. Drop shadow.
Open element 27, copy and close the original. Select the top layer and paste. Resize 15% and move to the bottom center of the crystal ball. Drop shadow.
Open element 4, copy and close the original. Select the crystal ball layer and paste. Resize 12% and move to the bottom right of the crystal ball. Drop shadow.
Open element 8, copy and close the original. Select the main tube layer and paste. Resize 15% and move to the bottom left of the clock. Duplicate and mirror. Move to the right of the clock. Drop shadow each layer.
Add any other elements you like.
Hide the white layer and merge visible.
Image, resize by 600 pixels on the longest side, all layers checked.
Add your copyright and name.
Save as png.
I hope you have enjoyed my tutorial. I would love to see your results.
Steam 3

Barbara Jensen Learning tutorials part 2. Animating with a psd file

This tutorial was written by me on June 18, 2020. The results are of my own imagination. Any resemblance to another tutorial is purely coincidental.
Please DO NOT claim this tutorial as your own.
This was written assuming you have a working knowledge of PSP.
Please keep in mind that I write the tutorial as I am creating it.
Sometimes I may not explain properly where to place things so please see my example if you are ever in doubt :)
Please remember to read the Terms of Use (TOU) for any tube, scrap kit and/or animation you use.
Supplies needed
I am using PSP 2018 but this tutorial should work with any version.
Animation Shop 3.11
PSPIMAGE tag file from Learning tutorial 1 - Barbara Jensen Free Tube & Kit Part 1. You can find the tutorial here.
I am using a Pay to Use (PTU) animation 31 from pack 9 created by Kiya Designs.
You can purchase this fun animation from Barbara's store here.
We will be using the PSD file for this tutorial. I will show you how to use the MNG file in my next tutorial.
Let's get started.
Open your pspimage tag from the tutorial mentioned above in psp. Holding down the shift + D duplicate the tag and close the original. Do not save changes.
Open KDAnimations-31.psd file in psp. Holding down the shift + D duplicate the animation and close the original. Do not save changes.
We will be working the the animation psd file first.
In the layers pallet you will notice there are 31 frames. Frame 31 layer at the top and if you scroll right down you will see frame 1 at the bottom. We could use all 31 layers but it would take forever to copy and paste it into animation shop.
I am going to show you how we cull the animation before we use it in our tag.
Standing on layer 31 - it will be highlighted in blue.

We want to select all our odd layers. To do this, hold down your Ctrl key on your keyboard, and with your mouse, select the next odd layer which is frame 29. Repeat the holding down the Ctrl key and click on frame 27. As you can see in my screen shot that the selected layers are all highlighted in blue.

Continue this process until you have all the odd layers selected. You can use the scroll bar in the layers pallet to view the lower layers. Just make sure the Ctrl key is not pressed when you scroll down.

When you reach Frame 1 all odd layers should be selected. You can use the scroll bar to double check. If you missed one just hold down the Ctrl key and click on that layer. If you notice you selected an even numbered frame that is ok we can fix that by once again holding down the Ctrl key and click on that layer. It will deselect (unlighted in blue).
All odd layers selected or highlighted in blue? If they are not repeat the steps above.
Yes? Ok on to the next step.
We need to group our selected frames.
Go to Layers>New Layer Group.

Another way to group the layers is by clicking on the New Layers Group icon.

You can locate it at the bottom of your Layers pallet. It is the square with, looks like, two papers stacked above one another. It should also be next to your trash can. See my screen shot below.
When you select the New Layers Group a pop up window will appear. You can rename this animation or leave it as Group 1. All other settings will stay the same. Click ok.

You will notice you have a new layer at the top of the layers pallet called Group 1 (or something different if you renamed it) with all the odd layers under it as sub layers. See my screen shot below.
Does your layer pallet look like this so far? If Yes on to the next step.

We need to link our group to the sub-layers. In my screen shot above you will notice an icon that looks like a chain link. We will be using this next.
This part is very important. When working with group layers, always make sure the main group layer is highlighted or selected. The sub-layers should not have any highlights on them.
When we move or resize a group it is done by selecting the Group layer. What we do to the group layer will affect the sub frame layers. For example, we resize Group 1 layer by 80%. All the sub-layers will be resized at the same time.
Ok enough of me babbling.
Is Group 1 selected? Good. Click on the link icon at the top of the layers pallet. You will notice a little link will appear on Group 1. We want to see that.

Next we need to copy the group so we can have it on our tag.
Standing on Group 1 layer,
Go to Edit>Copy or Ctrl + C on your keyboard.

Select your tag. It does not matter if you select a layer on your tag as the Group animation will always paste to the top in the layer pallet.
Go to Edit>Paste as a new layer.

Your tag should look like this.

And your layer pallet should look like this.

You can close the duplicated animation as we no longer need it. You do not have to save the changes.
Ok standing on Group 1 layer. See that little white down arrow on the left beside the group one layer. Click it to hide the group sub layers.
You layer pallet should looks something like this.

Next. I want to move this group 1 layer just above my frame layer. You can either select the group 1 layer and drag it down the layer pallet but since my frame layer is close to the bottom I am going to do the following:
Go to Layers>Arrange>Send to Bottom.

Your layer pallet should look like this.

Select Group 1 layer if it isn't already. Holding down the left mouse button drag the Group 1 layer above the frame layer. Or you can go to Layer>Arrange>Move up until the group 1 layer is above the frame.
Your layer pallet should look like this.

Next we need to resize the animation as it is very large.
Make sure Group 1 is selected.
Go to Image, Resize.

When the Resize box pops up, in the Percent field type 40 as we want to resize it by 40%. All layers not checked and click ok. See my screen shot bellow for the settings.

Ok now we need to move it into place. Make sure that Group 1 is still selected.
Select the Pick tool.

If you do not see it under the magnifying glass, click on the little white arrow and it will be hiding in there.
With your left mouse click on the center dot. Holding down your left mouse button, move the animation into a spot you like. See my screen shot below for where I placed it.

Time for use to animate.
Standing on the Group 1 layer click the little arrow beside it to expand the group.

Next scroll down until you see layer 1. You will notice a little eyeball on the bottom left corner of Frame 1 and none on Frame 3. The eye means that layer is visible and the others are hidden.

With frame layer one visible, go to Edit>Copy Special>copy merged.

Open Animation Shop.
Go to Edit>Past>As new Animation or Ctrl + V on the keyboard.

**Back to paintshop (psp).
Left click on the eyeball beside layer 1 to hide it and click on the eyeball on layer 3 to make is visible.

With frame layer three visible, go to Edit>Copy Special>copy merged.
Back to animation shop.
Go to Edit>Paste>After current frame or Ctrl + Shift + L on the keyboard.**

If you look on the bottom right corner of Animation shop it will show you how many frames are in the animation. Currently, there is two.

We are going to repeat from ** TO ** until we have 16 frames in animation shop.

Now we have 16 frames in animation shop but we do not know how the animation looks yet.
To view the animation go to View>Animation

or click on the Animiation icon next to the pointer with the ?.

I found the animation to fast and I want to slow this down.
To control the speed of the animation first you need to select all the frames.
Go to Edit>Select all or Ctrl + A on the keyboard.

Next go to Animation>Frame Properties.

When the pop up window appears change the display time to 15 and click ok.

For the display time, the higher the number the slower the animation will be.
You can view your animation again to see the difference.
Time to save the animation.
Go to File>Save As.

When the pop up box shows, find a place to save it on your computer, name the file and the save as type should be gif. See screen shot below.

A new pop up box will appear. I always choose the following. Better Image Quality.

Click on Customize button.
On the Colors tag my settings are 255 Colors, Optimized Octree and Error Diffusion selected.

On the Optimizations tab I have the three center boxes checked and the first and last box unchecked. Click ok.

Click Next, Next, Next and Finished.
You have just completed an animated tag using a psd file.
I hope you have enjoyed my tutorial. I would love to see your results.

Monday, February 5, 2024
Learning tutorial 1 - Barbara Jensen Free Tube & Kit Part 1

This tutorial was written by me on June 15, 2020. The results are of my own imagination. Any resemblance to another tutorial is purely coincidental.
Please DO NOT claim this tutorial as your own.
This was written assuming you have a working knowledge of PSP.
This is a basic learning tutorial for beginners.
Supplies needed
I am using PSP 2018 but this tutorial should work with any version.
I am using Barbara Jensen's awesome FTU learning bundle 1. The leaning kit includes a gorgeous tube by Barbara called Blameless and beautiful kit by Karmalized scraps called Passionate. You do not need a license to get this gorgeous bundle but you do have to be registered with the store. You can get this at her store here.
Mask: I am using Karmalized Scraps FTU mask 078. You can download it from her blog here. Left click to enlarge the mask then right click and save as. Save it where you will find it :) Open and minimize in PSP.
Plug in: None
Anytime you resize an element or tube you should sharpen it. I do this for each layer. To do this go to Adjust, Sharpness, Sharpen.
Let's get started.
Go to File>New.

When the new Image box pops up you want a width of 750 pixels, Hight of 800 pixels Resolution of 78 pixels. Raster Background selected, color white. Click ok.

Open Paper 3 from Karmalized Scraps Passionate kit.
I use the drag and drop process. Left click on the paper or element you want to use in the file folder. While holding down the left mouse button, drag it into an empty area in PaintShop Pro work space.
We need to copy the paper.
Go to Edit, Copy (or ctrl+c on the keyboard) close paper three by clicking on the X in the top right hand corner. The image we copied with be in the memory.

Select the new image.
Go to Edit, Paste as New Layer (or ctrl+v) on the keyboard.
Next step we need to apply a mask to the paper.
Open Karmalized Scraps AKK_Mask078.png in Paintshop and minimize it. Click on the - icon in the top right hand corner of the mask to minimize.
Standing on the paper layer of our new image.
You can see which layer is selected in the layers pallet on the right. The layer we have selected will be highlighted in blue.

Go to Layers>New Mask Layer>From Image.

In the Source Window, Click on the drop down, select AKK_Mask078.png.
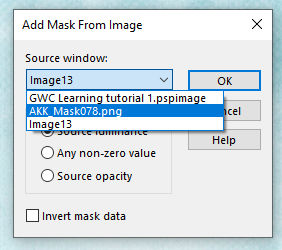
Other settings are Create mask from>Source luminance selected. Invert mask data unchecked. Click ok.

Next step.
In the layers pallet on the right you will see a new layer call Group - Raster 1 with two sub layers under it. This is our Mask layer and paper layer.

We need to merge this group into one layer. To do this, select the Group - Raster 1 layer (the layer will be highlighted in blue). Right mouse click on this layer. On the menu, select Merge and on the fly out window select merge group. Double left click on this layer and rename it mask.

We need to save in case psp crashes. Go to File> Save as and a pop up window will open. Find a file you would like to save it in and in the Save as type drop down select PSPIMAGE. Name your tag and click save. Saving it as a psp image will keep our tag in layers.
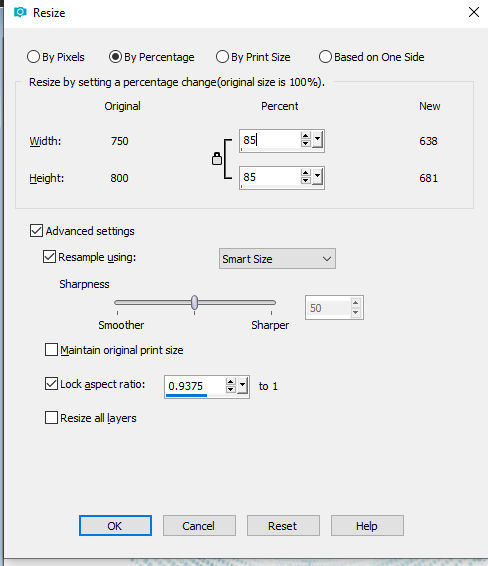
Next step we need to resize the mask. To do this go to Image>Resize. A new pop up window will show. Select the following: By Percentage. In the Resize by setting box type in 85 for the percentage. Advance settings: Resample checked, In the drop down I use Smart Size, all other settings are the same until you get to the bottom. Make sure Resize all layers is unchecked. Click ok.
Next step.
Using the same drag and drop method as above for the paper 3. Select Frame 3 and drag it into Paintshop.
Go to Edit> Copy. Select your new tag image and go to Edit>Paste as a new layer. Close Karmalized Scraps frame 3 by clicking the x in the top right hand corner.
Rename this layer Frame.
Using the same method as above for the mask, we need to resize the frame.
To do this go to Image>Resize. A new pop up window will show.
Select the following: By Percentage. In the Resize by setting box type in 65 for the percentage. Advance settings: Resample checked, In the drop down I use Smart Size, all other settings are the same until you get to the bottom. Make sure Resize all layers is unchecked. Click ok.
Next step. When we resize an image we loose the crispness of an image. In other words it can go blurry. To correct this we need to do the following. Select the layer in the layers pallet that we want to adjust. (It will be highlighted in blue)

Go to Adjust>Sharpness>Sharpen.

We need to move the frame into place. Select the move tool and click on the frame.

Holding down the left mouse button move the frame into place. See my screen shot below for placement.

Next step.
We need to add a paper layer under the frame layer.
Select the frame layer.
Then in the left side of PSP we need to select the magic wand tool.

My settings are as follows:

Mode: Add(Shift)
Match mode: RGB Value
Tolerance: 0
Congiguous checked
Feather: 0
Anti-alias checked
Dropdown: Outside.
With the frame layer selected, click in the center of the frame. You will notice marching ants around the center. This is what we want :).

Next step.
Go to Selections, modify, expand.

When the expand window comes up, in the Number of pixels: box type 5 and click ok.

Next step.
In the layers pallet, select mask layer.
Go to Layer>New Raster layer.

When the pop up box appears, change the Name to Paper and click ok.

The new paper layer should be highlighted in the layer pallet. If not select it.
Next Step.
Drag and drop paper 3 again.
Go to Edit>Copy. Close the paper 3 image by clicking on the X in the top right hand corner.
Next step is a little different for pasting. Go to Edit>Paste into Selections.

You will notice the paper only pasted into the selections we made. This is what we want :).
Go to Selections>Select none.

Next step. We need to add a drop shadow to the frame.
In the layers pallet, select the frame layer.
Go to Effects>3D Effects>Drop shadow.

A pop up window will appear. The setting I used are as follows:
Vertical 0
Horizontal 5
Opacity 50
Blue 10
Color Black.
Shadow on new layer unchecked. Click ok.
We will be using this drop shadow through out the tutorial unless otherwise stated.
Drag and drop element 10 into psps. Edit>copy. You can close element 10 by clicking on the X in the top right hand corner.
Select the Frame layer, go to Edit>Paste as a new layer. Rename this layer Element 10 using the steps mentioned above.
Go to Image>Resize. A new pop up window will show.
Select the following: By Percentage. In the Resize by setting box type in 30% for the percentage. Advance settings: Resample checked, In the drop down I use Smart Size, all other settings are the same until you get to the bottom. Make sure Resize all layers is unchecked. Click ok.
Go to Adjust>Sharpness>Sharpen.
Go to Effects>3D Effects>Drop shadow.
A pop up window will appear. We will be using the same settings as earlier. Click ok.
We need to move element 10 into place. Select the move tool and click on the frame. Holding down the left mouse button move the element into place. See my screen shot below for placement.

Drag and drop element 7 go to Edit>copy. You can close element 7 by clicking on the X in the top right hand corner.
Select the element 10 layer, go to Edit>Paste as a new layer. Rename this layer Element 7 using the steps mentioned above.
Go to Image>Resize. A new pop up window will show.
Select the following: By Percentage. In the Resize by setting box type in 50% for the percentage. Advance settings: Resample checked, In the drop down I use Smart Size, all other settings are the same until you get to the bottom. Make sure Resize all layers is unchecked. Click ok.
Go to Adjust>Sharpness>Sharpen.
Go to Effects>3D Effects>Drop shadow.
A pop up window will appear. We will be using the same settings as earlier. Click ok.
We need to move element 7 into place. Select the move tool and click on the frame. Holding down the left mouse button move the element into place. See my screen shot below for placement.

Drag and drop element 11 and go to Edit>copy. You can close element 11 by clicking on the X in the top right hand corner.
Select the element 7 layer, go to Edit>Paste as a new layer. Rename this layer Element 11 using the steps mentioned above.
Go to Image>Resize. A new pop up window will show.
Select the following: By Percentage. In the Resize by setting box type in 50% for the percentage. Advance settings: Resample checked, In the drop down I use Smart Size, all other settings are the same until you get to the bottom. Make sure Resize all layers is unchecked. Click ok.
Go to Adjust>Sharpness>Sharpen.
Go to Effects>3D Effects>Drop shadow.
A pop up window will appear. We will be using the same settings as earlier. Click ok.
We need to move element 11 into place. Select the move tool and click on the frame. Holding down the left mouse button move the element into place. See my screen shot below for placement.

Drag and drop element 5, and go to Edit>copy. You can close element 5 by clicking on the X in the top right hand corner.
Select the element 11 layer, go to Edit>Paste as a new layer. Rename this layer Element 5 using the steps mentioned above.
Go to Image>Resize. A new pop up window will show.
Select the following: By Percentage. In the Resize by setting box type in 30% for the percentage. Advance settings: Resample checked, In the drop down I use Smart Size, all other settings are the same until you get to the bottom. Make sure Resize all layers is unchecked. Click ok.
Go to Adjust>Sharpness>Sharpen.
Go to Effects>3D Effects>Drop shadow.
A pop up window will appear. We will be using the same settings as earlier. Click ok.
We need to move element 5 into place. Select the move tool and click on the frame. Holding down the left mouse button move the element into place. See my screen shot below for placement.

Next step. Select the eraser tool (it looks like a pencil end with an eraser)  with the following settings:
 with the following settings:
Round brush,
Shape: Circle
Size 50
Hardness 75
Step 10
Density and Thickness 100
Rotation 0
Opacity 100
SmartEdge unchecked
With element 5 layer selected, erase the bottom of the stem until almost the frame. See my screen shot above.
Drag and drop element 15, and go to Edit>copy. You can close element 15 by clicking on the X in the top right hand corner.
Select the element 5 layer, go to Edit>Paste as a new layer. Rename this layer Element 15 using the steps mentioned above.
Go to Image>Resize. A new pop up window will show.
Select the following: By Percentage. In the Resize by setting box type in 30% for the percentage. Advance settings: Resample checked, In the drop down I use Smart Size, all other settings are the same until you get to the bottom. Make sure Resize all layers is unchecked. Click ok.
Go to Adjust>Sharpness>Sharpen.
Go to Effects>3D Effects>Drop shadow.
A pop up window will appear. We will be using the same settings as earlier. Click ok.
We need to move element 15 into place. Select the move tool and click on the frame. Holding down the left mouse button move the element into place. See my screen shot below for placement.

Drag and drop Barbara Jensen's tube and go to Edit>copy. You can minimize the tube by clicking on the - in the top right hand corner.
Select the element 15 layer, go to Edit>Paste as a new layer. Rename this layer Tube using the steps mentioned above.
Go to Image>Resize. A new pop up window will show.
Select the following: By Percentage. In the Resize by setting box type in 80% for the percentage. Advance settings: Resample checked, In the drop down I use Smart Size, all other settings are the same until you get to the bottom. Make sure Resize all layers is unchecked. Click ok.
Go to Adjust>Sharpness>Sharpen.
Go to Effects>3D Effects>Drop shadow.
A pop up window will appear. We will be using the same settings as earlier. Click ok.
We need to move the tube into place. Select the move tool and click on the frame. Holding down the left mouse button move the element into place. See my screen shot below for placement.

Drag and drop element 8 and go to Edit>copy. You can close element 8 by clicking on the X in the top right hand corner.
Select the tube layer, go to Edit>Paste as a new layer. Rename this layer Element 8 using the steps mentioned above.
Go to Image>Resize. A new pop up window will show.
Select the following: By Percentage. In the Resize by setting box type in 30% for the percentage. Advance settings: Resample checked, In the drop down I use Smart Size, all other settings are the same until you get to the bottom. Make sure Resize all layers is unchecked. Click ok.
Go to Adjust>Sharpness>Sharpen.
Go to Effects>3D Effects>Drop shadow.
A pop up window will appear. We will be using the same settings as earlier. Click ok.
We need to move element 8 into place. Select the move tool and click on the frame. Holding down the left mouse button move the element into place. See my screen shot below for placement.

Drag and drop element 13 and go to Edit>copy. You can close element 13 by clicking on the X in the top right hand corner.
Select the element 8 layer, go to Edit>Paste as a new layer. Rename this layer Element 13 using the steps mentioned above.
Go to Image>Resize. A new pop up window will show.
Select the following: By Percentage. In the Resize by setting box type in 30% for the percentage. Advance settings: Resample checked, In the drop down I use Smart Size, all other settings are the same until you get to the bottom. Make sure Resize all layers is unchecked. Click ok.
Go to Adjust>Sharpness>Sharpen.
Go to Effects>3D Effects>Drop shadow.
A pop up window will appear. We will be using the same settings as earlier. Click ok.
We need to move element 13 into place. Select the move tool and click on the frame. Holding down the left mouse button move the element into place. See my screen shot below for placement.

Drag and drop element 6 and go to Edit>copy. You can close element 6 by clicking on the X in the top right hand corner.
Select the element 13 layer, go to Edit>Paste as a new layer. Rename this layer Element 13 using the steps mentioned above.
Go to Image>Resize. A new pop up window will show.
Select the following: By Percentage. In the Resize by setting box type in 30% for the percentage. Advance settings: Resample checked, In the drop down I use Smart Size, all other settings are the same until you get to the bottom. Make sure Resize all layers is unchecked. Click ok.
Go to Adjust>Sharpness>Sharpen.
Go to Effects>3D Effects>Drop shadow.
A pop up window will appear. We will be using the same settings as earlier. Click ok.
We need to move element 6 into place. Select the move tool and click on the frame. Holding down the left mouse button move the element into place. See my screen shot below for placement.

Next we need to add the copyright. Maximize Barbara Jensen's tube by clicking on the the icon that looks like two papers stacked.

You will see three layers. The tube layer and then two copyright credit layers. Click on the eyeball next to the tube layer to hide it.

Next go to Edit>copy special>copy merged. You can close the tube by clicking on the X in the top right hand corner. Do not save changes when it asks.

Select element 6 layer and go to Edit>Paste as a new layer.
We need to drop shadow so the copyright stands out a bit better.
Go to Effects>3D Effects>Drop shadow.

A pop up window will appear. The setting I used are as follows:
Vertical 2
Horizontal 2
Opacity 100
Blue 2
Color white.
Shadow on new layer unchecked. Click ok.
Repeat the drop shadow by doing the following:
Go to Effects>3D Effects>Drop shadow.
A pop up window will appear. The setting I used are as follows:
Vertical -2
Horizontal -2
Opacity 100
Blur 2
Color white.
Shadow on new layer unchecked. Click ok.
Don't forget to save your tag. Go to File>Save as we saved it earlier.
Next we need to resize it down a bit to get ride of the extra space around the tag. For this tag I did the following:
Image>Canvas size and a window will pop up. See my screen shot below for my settings.

Once your settings match mine, click ok.
Save your tag again.
Next we need to add your name.

In the Materials pallet left click on the bottom white square (Background). In the HTML put #8ab7d1.

In the Materials pallet left click on the top black square (Foreground). In the HTML put #ffffff.
Select the text tool

The setting I used are as follows:

Font Arial Black
Size 48
Units: Pixels
Font color will populate with the background color we selected earlier.
Alignment center
Direction down and to the right.
Anti-alias: Sharp
Stroke 2
Stroke color is the foreground color we selected earlier.
Create as vector
Straight line
Warp text and auto Kern checked.
Select the copyright layer and type your name.
In the layer pallet you will see a Vector layer. This is the text layer. Right click on this layer and choose convert to raster layer.

Now as this is a raster layer we can apply a drop shadow to it. I used the following settings.
Vertical 0
Horizontal 2
Opacity 50
Blur 5
Color Black.
Don't forget to save.
Scroll down until you see the white layer. Click on the eye beside this layer to hide it.
Go to file>save as. When the pop up box opens find a place you would like to save your tag. In the save as type, click on the drop down and select .png.
You have now created your tag.
Please keep the pspimage file handy as I will be writing up a tutorial on how to animate this tag.
I hope you had fun.
I would love to see your results.
Subscribe to:
Posts
(Atom)
My Blinkie
I CT for