My Tag Blog

Favorite Stores


My Favorite Blogs


Monday, February 5, 2024
Learning tutorial 1 - Barbara Jensen Free Tube & Kit Part 1

This tutorial was written by me on June 15, 2020. The results are of my own imagination. Any resemblance to another tutorial is purely coincidental.
Please DO NOT claim this tutorial as your own.
This was written assuming you have a working knowledge of PSP.
This is a basic learning tutorial for beginners.
Supplies needed
I am using PSP 2018 but this tutorial should work with any version.
I am using Barbara Jensen's awesome FTU learning bundle 1. The leaning kit includes a gorgeous tube by Barbara called Blameless and beautiful kit by Karmalized scraps called Passionate. You do not need a license to get this gorgeous bundle but you do have to be registered with the store. You can get this at her store here.
Mask: I am using Karmalized Scraps FTU mask 078. You can download it from her blog here. Left click to enlarge the mask then right click and save as. Save it where you will find it :) Open and minimize in PSP.
Plug in: None
Anytime you resize an element or tube you should sharpen it. I do this for each layer. To do this go to Adjust, Sharpness, Sharpen.
Let's get started.
Go to File>New.

When the new Image box pops up you want a width of 750 pixels, Hight of 800 pixels Resolution of 78 pixels. Raster Background selected, color white. Click ok.

Open Paper 3 from Karmalized Scraps Passionate kit.
I use the drag and drop process. Left click on the paper or element you want to use in the file folder. While holding down the left mouse button, drag it into an empty area in PaintShop Pro work space.
We need to copy the paper.
Go to Edit, Copy (or ctrl+c on the keyboard) close paper three by clicking on the X in the top right hand corner. The image we copied with be in the memory.

Select the new image.
Go to Edit, Paste as New Layer (or ctrl+v) on the keyboard.
Next step we need to apply a mask to the paper.
Open Karmalized Scraps AKK_Mask078.png in Paintshop and minimize it. Click on the - icon in the top right hand corner of the mask to minimize.
Standing on the paper layer of our new image.
You can see which layer is selected in the layers pallet on the right. The layer we have selected will be highlighted in blue.

Go to Layers>New Mask Layer>From Image.

In the Source Window, Click on the drop down, select AKK_Mask078.png.
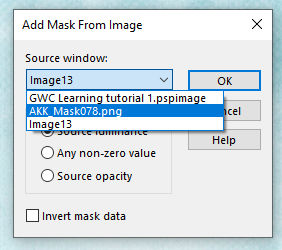
Other settings are Create mask from>Source luminance selected. Invert mask data unchecked. Click ok.

Next step.
In the layers pallet on the right you will see a new layer call Group - Raster 1 with two sub layers under it. This is our Mask layer and paper layer.

We need to merge this group into one layer. To do this, select the Group - Raster 1 layer (the layer will be highlighted in blue). Right mouse click on this layer. On the menu, select Merge and on the fly out window select merge group. Double left click on this layer and rename it mask.

We need to save in case psp crashes. Go to File> Save as and a pop up window will open. Find a file you would like to save it in and in the Save as type drop down select PSPIMAGE. Name your tag and click save. Saving it as a psp image will keep our tag in layers.
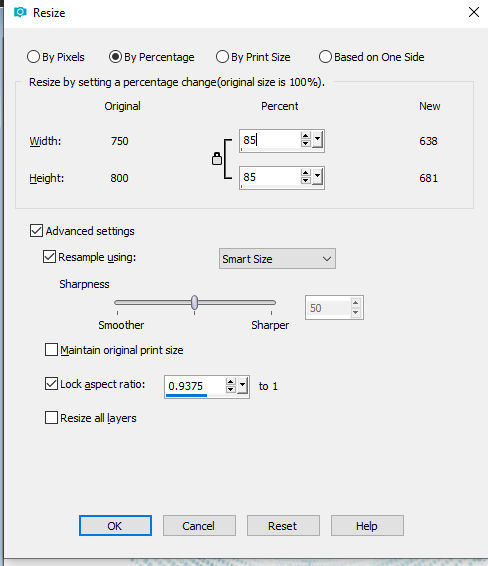
Next step we need to resize the mask. To do this go to Image>Resize. A new pop up window will show. Select the following: By Percentage. In the Resize by setting box type in 85 for the percentage. Advance settings: Resample checked, In the drop down I use Smart Size, all other settings are the same until you get to the bottom. Make sure Resize all layers is unchecked. Click ok.
Next step.
Using the same drag and drop method as above for the paper 3. Select Frame 3 and drag it into Paintshop.
Go to Edit> Copy. Select your new tag image and go to Edit>Paste as a new layer. Close Karmalized Scraps frame 3 by clicking the x in the top right hand corner.
Rename this layer Frame.
Using the same method as above for the mask, we need to resize the frame.
To do this go to Image>Resize. A new pop up window will show.
Select the following: By Percentage. In the Resize by setting box type in 65 for the percentage. Advance settings: Resample checked, In the drop down I use Smart Size, all other settings are the same until you get to the bottom. Make sure Resize all layers is unchecked. Click ok.
Next step. When we resize an image we loose the crispness of an image. In other words it can go blurry. To correct this we need to do the following. Select the layer in the layers pallet that we want to adjust. (It will be highlighted in blue)

Go to Adjust>Sharpness>Sharpen.

We need to move the frame into place. Select the move tool and click on the frame.

Holding down the left mouse button move the frame into place. See my screen shot below for placement.

Next step.
We need to add a paper layer under the frame layer.
Select the frame layer.
Then in the left side of PSP we need to select the magic wand tool.

My settings are as follows:

Mode: Add(Shift)
Match mode: RGB Value
Tolerance: 0
Congiguous checked
Feather: 0
Anti-alias checked
Dropdown: Outside.
With the frame layer selected, click in the center of the frame. You will notice marching ants around the center. This is what we want :).

Next step.
Go to Selections, modify, expand.

When the expand window comes up, in the Number of pixels: box type 5 and click ok.

Next step.
In the layers pallet, select mask layer.
Go to Layer>New Raster layer.

When the pop up box appears, change the Name to Paper and click ok.

The new paper layer should be highlighted in the layer pallet. If not select it.
Next Step.
Drag and drop paper 3 again.
Go to Edit>Copy. Close the paper 3 image by clicking on the X in the top right hand corner.
Next step is a little different for pasting. Go to Edit>Paste into Selections.

You will notice the paper only pasted into the selections we made. This is what we want :).
Go to Selections>Select none.

Next step. We need to add a drop shadow to the frame.
In the layers pallet, select the frame layer.
Go to Effects>3D Effects>Drop shadow.

A pop up window will appear. The setting I used are as follows:
Vertical 0
Horizontal 5
Opacity 50
Blue 10
Color Black.
Shadow on new layer unchecked. Click ok.
We will be using this drop shadow through out the tutorial unless otherwise stated.
Drag and drop element 10 into psps. Edit>copy. You can close element 10 by clicking on the X in the top right hand corner.
Select the Frame layer, go to Edit>Paste as a new layer. Rename this layer Element 10 using the steps mentioned above.
Go to Image>Resize. A new pop up window will show.
Select the following: By Percentage. In the Resize by setting box type in 30% for the percentage. Advance settings: Resample checked, In the drop down I use Smart Size, all other settings are the same until you get to the bottom. Make sure Resize all layers is unchecked. Click ok.
Go to Adjust>Sharpness>Sharpen.
Go to Effects>3D Effects>Drop shadow.
A pop up window will appear. We will be using the same settings as earlier. Click ok.
We need to move element 10 into place. Select the move tool and click on the frame. Holding down the left mouse button move the element into place. See my screen shot below for placement.

Drag and drop element 7 go to Edit>copy. You can close element 7 by clicking on the X in the top right hand corner.
Select the element 10 layer, go to Edit>Paste as a new layer. Rename this layer Element 7 using the steps mentioned above.
Go to Image>Resize. A new pop up window will show.
Select the following: By Percentage. In the Resize by setting box type in 50% for the percentage. Advance settings: Resample checked, In the drop down I use Smart Size, all other settings are the same until you get to the bottom. Make sure Resize all layers is unchecked. Click ok.
Go to Adjust>Sharpness>Sharpen.
Go to Effects>3D Effects>Drop shadow.
A pop up window will appear. We will be using the same settings as earlier. Click ok.
We need to move element 7 into place. Select the move tool and click on the frame. Holding down the left mouse button move the element into place. See my screen shot below for placement.

Drag and drop element 11 and go to Edit>copy. You can close element 11 by clicking on the X in the top right hand corner.
Select the element 7 layer, go to Edit>Paste as a new layer. Rename this layer Element 11 using the steps mentioned above.
Go to Image>Resize. A new pop up window will show.
Select the following: By Percentage. In the Resize by setting box type in 50% for the percentage. Advance settings: Resample checked, In the drop down I use Smart Size, all other settings are the same until you get to the bottom. Make sure Resize all layers is unchecked. Click ok.
Go to Adjust>Sharpness>Sharpen.
Go to Effects>3D Effects>Drop shadow.
A pop up window will appear. We will be using the same settings as earlier. Click ok.
We need to move element 11 into place. Select the move tool and click on the frame. Holding down the left mouse button move the element into place. See my screen shot below for placement.

Drag and drop element 5, and go to Edit>copy. You can close element 5 by clicking on the X in the top right hand corner.
Select the element 11 layer, go to Edit>Paste as a new layer. Rename this layer Element 5 using the steps mentioned above.
Go to Image>Resize. A new pop up window will show.
Select the following: By Percentage. In the Resize by setting box type in 30% for the percentage. Advance settings: Resample checked, In the drop down I use Smart Size, all other settings are the same until you get to the bottom. Make sure Resize all layers is unchecked. Click ok.
Go to Adjust>Sharpness>Sharpen.
Go to Effects>3D Effects>Drop shadow.
A pop up window will appear. We will be using the same settings as earlier. Click ok.
We need to move element 5 into place. Select the move tool and click on the frame. Holding down the left mouse button move the element into place. See my screen shot below for placement.

Next step. Select the eraser tool (it looks like a pencil end with an eraser)  with the following settings:
 with the following settings:
Round brush,
Shape: Circle
Size 50
Hardness 75
Step 10
Density and Thickness 100
Rotation 0
Opacity 100
SmartEdge unchecked
With element 5 layer selected, erase the bottom of the stem until almost the frame. See my screen shot above.
Drag and drop element 15, and go to Edit>copy. You can close element 15 by clicking on the X in the top right hand corner.
Select the element 5 layer, go to Edit>Paste as a new layer. Rename this layer Element 15 using the steps mentioned above.
Go to Image>Resize. A new pop up window will show.
Select the following: By Percentage. In the Resize by setting box type in 30% for the percentage. Advance settings: Resample checked, In the drop down I use Smart Size, all other settings are the same until you get to the bottom. Make sure Resize all layers is unchecked. Click ok.
Go to Adjust>Sharpness>Sharpen.
Go to Effects>3D Effects>Drop shadow.
A pop up window will appear. We will be using the same settings as earlier. Click ok.
We need to move element 15 into place. Select the move tool and click on the frame. Holding down the left mouse button move the element into place. See my screen shot below for placement.

Drag and drop Barbara Jensen's tube and go to Edit>copy. You can minimize the tube by clicking on the - in the top right hand corner.
Select the element 15 layer, go to Edit>Paste as a new layer. Rename this layer Tube using the steps mentioned above.
Go to Image>Resize. A new pop up window will show.
Select the following: By Percentage. In the Resize by setting box type in 80% for the percentage. Advance settings: Resample checked, In the drop down I use Smart Size, all other settings are the same until you get to the bottom. Make sure Resize all layers is unchecked. Click ok.
Go to Adjust>Sharpness>Sharpen.
Go to Effects>3D Effects>Drop shadow.
A pop up window will appear. We will be using the same settings as earlier. Click ok.
We need to move the tube into place. Select the move tool and click on the frame. Holding down the left mouse button move the element into place. See my screen shot below for placement.

Drag and drop element 8 and go to Edit>copy. You can close element 8 by clicking on the X in the top right hand corner.
Select the tube layer, go to Edit>Paste as a new layer. Rename this layer Element 8 using the steps mentioned above.
Go to Image>Resize. A new pop up window will show.
Select the following: By Percentage. In the Resize by setting box type in 30% for the percentage. Advance settings: Resample checked, In the drop down I use Smart Size, all other settings are the same until you get to the bottom. Make sure Resize all layers is unchecked. Click ok.
Go to Adjust>Sharpness>Sharpen.
Go to Effects>3D Effects>Drop shadow.
A pop up window will appear. We will be using the same settings as earlier. Click ok.
We need to move element 8 into place. Select the move tool and click on the frame. Holding down the left mouse button move the element into place. See my screen shot below for placement.

Drag and drop element 13 and go to Edit>copy. You can close element 13 by clicking on the X in the top right hand corner.
Select the element 8 layer, go to Edit>Paste as a new layer. Rename this layer Element 13 using the steps mentioned above.
Go to Image>Resize. A new pop up window will show.
Select the following: By Percentage. In the Resize by setting box type in 30% for the percentage. Advance settings: Resample checked, In the drop down I use Smart Size, all other settings are the same until you get to the bottom. Make sure Resize all layers is unchecked. Click ok.
Go to Adjust>Sharpness>Sharpen.
Go to Effects>3D Effects>Drop shadow.
A pop up window will appear. We will be using the same settings as earlier. Click ok.
We need to move element 13 into place. Select the move tool and click on the frame. Holding down the left mouse button move the element into place. See my screen shot below for placement.

Drag and drop element 6 and go to Edit>copy. You can close element 6 by clicking on the X in the top right hand corner.
Select the element 13 layer, go to Edit>Paste as a new layer. Rename this layer Element 13 using the steps mentioned above.
Go to Image>Resize. A new pop up window will show.
Select the following: By Percentage. In the Resize by setting box type in 30% for the percentage. Advance settings: Resample checked, In the drop down I use Smart Size, all other settings are the same until you get to the bottom. Make sure Resize all layers is unchecked. Click ok.
Go to Adjust>Sharpness>Sharpen.
Go to Effects>3D Effects>Drop shadow.
A pop up window will appear. We will be using the same settings as earlier. Click ok.
We need to move element 6 into place. Select the move tool and click on the frame. Holding down the left mouse button move the element into place. See my screen shot below for placement.

Next we need to add the copyright. Maximize Barbara Jensen's tube by clicking on the the icon that looks like two papers stacked.

You will see three layers. The tube layer and then two copyright credit layers. Click on the eyeball next to the tube layer to hide it.

Next go to Edit>copy special>copy merged. You can close the tube by clicking on the X in the top right hand corner. Do not save changes when it asks.

Select element 6 layer and go to Edit>Paste as a new layer.
We need to drop shadow so the copyright stands out a bit better.
Go to Effects>3D Effects>Drop shadow.

A pop up window will appear. The setting I used are as follows:
Vertical 2
Horizontal 2
Opacity 100
Blue 2
Color white.
Shadow on new layer unchecked. Click ok.
Repeat the drop shadow by doing the following:
Go to Effects>3D Effects>Drop shadow.
A pop up window will appear. The setting I used are as follows:
Vertical -2
Horizontal -2
Opacity 100
Blur 2
Color white.
Shadow on new layer unchecked. Click ok.
Don't forget to save your tag. Go to File>Save as we saved it earlier.
Next we need to resize it down a bit to get ride of the extra space around the tag. For this tag I did the following:
Image>Canvas size and a window will pop up. See my screen shot below for my settings.

Once your settings match mine, click ok.
Save your tag again.
Next we need to add your name.

In the Materials pallet left click on the bottom white square (Background). In the HTML put #8ab7d1.

In the Materials pallet left click on the top black square (Foreground). In the HTML put #ffffff.
Select the text tool

The setting I used are as follows:
Font Arial Black
Size 48
Units: Pixels
Font color will populate with the background color we selected earlier.
Alignment center
Direction down and to the right.
Anti-alias: Sharp
Stroke 2
Stroke color is the foreground color we selected earlier.
Create as vector
Straight line
Warp text and auto Kern checked.
Select the copyright layer and type your name.
In the layer pallet you will see a Vector layer. This is the text layer. Right click on this layer and choose convert to raster layer.

Now as this is a raster layer we can apply a drop shadow to it. I used the following settings.
Vertical 0
Horizontal 2
Opacity 50
Blur 5
Color Black.
Don't forget to save.
Scroll down until you see the white layer. Click on the eye beside this layer to hide it.
Go to file>save as. When the pop up box opens find a place you would like to save your tag. In the save as type, click on the drop down and select .png.
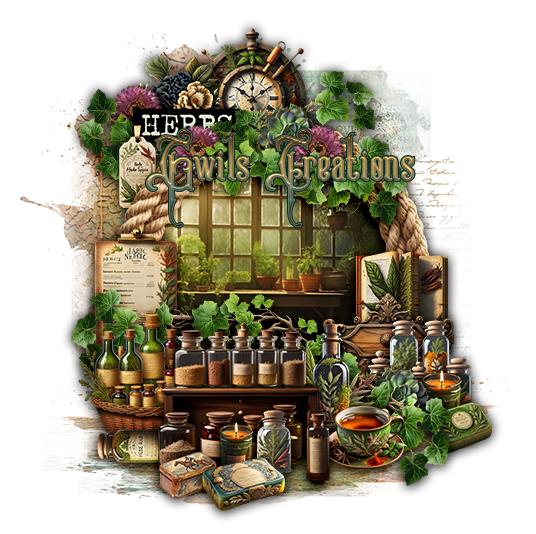
You have now created your tag.
Please keep the pspimage file handy as I will be writing up a tutorial on how to animate this tag.
I hope you had fun.
I would love to see your results.
My Blinkie

I CT for


