This tutorial was written by me on May 17, 2020. The results are of my own imagination. Any resemblance to another tutorial is purely coincidental.
Please DO NOT claim this tutorial as your own.
This was written assuming you have a working knowledge of PSP.
Please keep in mind that I write the tutorial as I am creating it.
Sometimes I may not explain properly where to place things so please see my example if you are ever in doubt :)
Supplies needed
I am using PSP 2018 but this tutorial should work with any version.
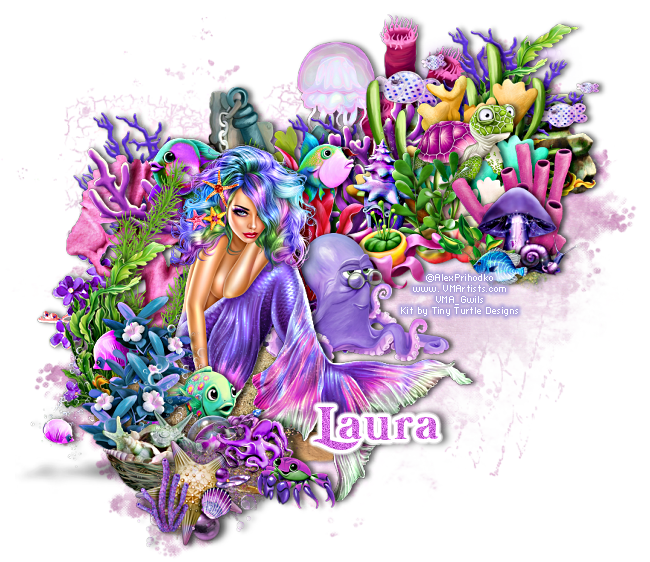
PTU Tube: I am using Alex Prihodko's beautiful Mermaid 2. Please do not use this tube without a proper license.
You can purchase this tube at VMA store here.
PTU Kit: I am using a beautiful kit called "UnderSea Beauty" created by Tiny Turtle Designs. This kit can be purchased here.
Mask: Mask 102 by Moonbeams and Spiderwebs. You can get it here. Open and minimize in PSP.
Font of choice for you name.
Drop shadow of choice.
Vivienne's Paintbox has awesome drop shadow settings that I use a lot. You can find the settings here and check out her awesome tutorials :)
Anytime you resize an element or tube you should sharpen it. I do this for each layer I resize. Go to Adjust, Sharpness, Sharpen.
You might want to take a break for coffee as this is a very long tutorial.
Let's get started.
Open a new 900x800 transparent image. We will resize later.
Add a new layer and flood fill with white.
Open paper 3, copy and close the original. Add a new raster layer and select all. Edit, paste into selections. Select none. Go to Layers, new mask layer, from image. In the Source window, select MB & SW Mask 102. Source luminance selected, Invert mask data checked, click ok. Merge group, duplicate and standing on the top mask layer, merge down. You can close the mask as we no longer require it.
Open element 100, copy and close the original. Select the mask layer and paste. Move to the upper right corner of the mask.
Open element 67, copy and close the original. Select the spray layer and paste. Resize 50%, sharpen and drop shadow. Move to the upper right of the mask approx. the middle of the spray.
Open element 61, copy and close the original. Select the top layer and paste. Resize 50%, sharpen and drop shadow. Move to the top right corner of the mask so it slightly overlaps element 67.
Open element 156, copy and close the original. Select the top layer and paste. Move to the lower left of the mask and drop shadow.
Open element 106, copy and close the original. Select the top layer and paste. Resize 40%, sharpen and drop shadow. Move to the upper right of the mask so it slightly overlaps the pink urchin.
Open element 3, copy and close the original. Select the top layer and paste. Resize 50%, sharpen and drop shadow. Move to the upper middle of the mask so it slightly overlaps the jelly fish.
Open element 30, copy and close the original. Select the top layer and paste. Resize 40%, sharpen and drop shadow. Move to the upper middle of the mask so it overlaps the anchor and slightly overlaps the jelly fish. Duplicate and move to the upper right of the mask above the rocks. Duplicate one more time and move to the upper left of the mask so it slightly covers the anchor.
Open element 2, copy and close the original. Select the top layer and paste. Resize 50%, sharpen and drop shadow. Move to the upper middle of the mask so it slightly covers the anchor.
Open element 27, copy and close the original. Select the top layer and paste. Resize 50%, sharpen and drop shadow. Move to the upper left of the mask so it slightly covers the anchor and coral.
Open element 64, copy and close the original. Select the top layer and paste. Move to the upper middle of the mask so it slightly covers the anchor and coral. Drop shadow.
Open element 47, copy and close the original. Select the top layer and paste. Resize 40%, sharpen and drop shadow. Move to the upper middle of the large purple coral.
Open element 38, copy and close the original. Select the top layer and paste. Resize 20%, sharpen and drop shadow. Move to the upper middle of the red sea weed.
Open element 39, copy and close the original. Select the top layer and paste. Resize 20%, sharpen and drop shadow. Move to the upper left of the anchor.
Open element 72, copy and close the original. Select the top layer and paste. Resize 70%, sharpen and drop shadow. Move to the lower left so it slightly covers the fish and anchor.
Open element 101, copy and close the original. Select the top layer and paste. Resize 70%, sharpen and drop shadow. Move to the upper right so it looks like the fish of the left is kissing the jelly fish.
Open element 129, copy and close the original. Select the top layer and paste. Resize 40%, sharpen and drop shadow. Move to the upper right so it covers the bottom edge of the rock. Duplicate and move to the bottom left so it covers the bottom of the weed layer.
Open element 117, copy and close the original. Select the top layer and paste. Resize 60%, sharpen and drop shadow. Move to the lower left so it covers the edge of the purple flowers and sea weed.
Open element 128, copy and close the original. Select the top layer and paste. Resize 40%, sharpen and drop shadow. Move to the lower left so it covers the right edge of sand hill. Duplicate and move to the right so it overlaps the original sand layer.
Open element 17, copy and close the original. Select the top layer and paste. Resize 60%, sharpen and drop shadow. Move to the upper right so the left green leaf covers the lips of the polka dot fish.
Open element 76, copy and close the original. Select the top layer and paste. Resize 30%, sharpen and drop shadow. Move to the upper right so it's about the middle of element 17.
Open element 34, copy and close the original. Select the top layer and paste. Resize 30%, sharpen, mirror and drop shadow. Move to the upper middle so it slightly covers the back turtle leg.
Open element 41, copy and close the original. Select the top layer and paste. Resize 30%, sharpen and drop shadow. Move to the upper middle so it slightly covers the turtle's leg.
Open element 33, copy and close the original. Select the top layer and paste. Resize 40%, sharpen and drop shadow. Move to the upper left so it slightly covers the turtle's front flipper and sea shell.
Open element 88, copy and close the original. Select the top layer and paste. Resize 35%, sharpen and drop shadow. Move to the upper left so it covers the bottom of element 33.
Open element 57, copy and close the original. Select the top layer and paste. Resize 40%, sharpen and drop shadow. Move to the middle so it covers the bottom of the shell house.
Open element 13, copy and close the original. Select the top layer and paste. Resize 60%, sharpen and drop shadow. Move to the middle so it looks like the left side is lined up with the sand hill.
Open your tube, hide the copyright, close up and pink layers, Edit copy special, copy merged. You can close the original. Select the top layer and paste. Resize 40%, sharpen and drop shadow. Move to the middle of the sand hill so it looks like she is sitting on it.
Open element 54, copy and close the original. Select the top layer and paste. Resize 20%, sharpen and drop shadow. Move to the bottom left so it covers the mermaid's hand.
Open element 56, copy and close the original. Select the top layer and paste. Resize 20%, sharpen and drop shadow. Move to the bottom left so it slightly covers the the bottom of the fish.
Open element 23, copy and close the original. Select the top layer and paste. Resize 50%, sharpen and drop shadow. Move to the bottom left so it slightly covers the the bottom of the sand.
Open element 133, copy and close the original. Select the top layer and paste. Resize 25%, sharpen and drop shadow. Move to the bottom left so it covers the the bottom of element 23.
Open element 95, copy and close the original. Select the top layer and paste. Resize 50%, sharpen and drop shadow. Move to the bottom left so it slightly covers the the the shell basket and shell with bubble.
Open element 59, copy and close the original. Select the top layer and paste. Resize 20%, sharpen and drop shadow. Move to the bottom left of the mushroom.
Open element 66, copy and close the original. Select the top layer and paste. Resize 15%, sharpen and drop shadow. Move to the bottom left of the mushroom.
Open element 32, copy and close the original. Select the top layer and paste. Resize 20%, sharpen and drop shadow. Move to the bottom left of of the tubes tail.
Add any other elements you like.
Image, resize by 650 pixels on the longest side, all layers checked.
Add your copyright and name.
Hide the white layer and merge visible.
Save as png.
I hope you have enjoyed my tutorial. I would love to see your results.


