My Tag Blog

Favorite Stores


My Favorite Blogs


Wednesday, February 7, 2024
Irish Spirit

This tutorial was written by me on February 29, 2016. The results are of my own imagination. Any resemblance to another tutorial is purely coincidental.
Please DO NOT claim this tutorial as your own.
This was written assuming you have working knowledge of PSP.
Please keep in mind that I write the tutorial as I am creating it.
Supplies needed
I am using PSP X6 but this tutorial should work with any version.
Animation shop (Optional)
PTU Tube: I am using a gorgeous tube created by Elias Chatzoudis.
Please do not use his tubes without a proper licence. I purchased mine through PTE.
You can purchase this beauty at CDO here.
FTU Kit: I am using Feeling Lucky by HorsePlay Pastures. You can download this gorgeous kit here.
Mask: Vix St. Paticks Day Mask 2. You can get it here. Just right click on the mask and save to your computer. Open in psps and minimize.
Font of choice for your name
FTU Animation: I am using Sophisticat Simone's awesome St. Patrick's animation 289 which you can get here.
I am using a drop shadow of V/H 3, Opacity 50, blur 5, color black through out the tutorial unless otherwise stated.
Open a new 600x600 transparent image.
Open element 14, copy and close the original. Paste as a new layer and resize 80% all layers not checked.
Using your magic wand with the following settings:

Click inside the frame. Selections - Modify - Expand by 5.
Open paper of choice. I am using paper 13, copy and close the original. Paste as a new layer. Selections - invert and standing on the paper layer, hit delete on your keyboard. Select none. Drop shadow the frame. Move the paper layer under the frame layer.
Copy your main tube and paste as a new layer. Resize 80% and then Adjust - Sharpness - Sharpen. Drop shadow.
Open element 19, copy and close the original. Select the frame layer and paste. Resize 70% and move to the bottom center. See mine for placement. Drop shadow.
Open element 47, copy and close the original. Select the top layer and paste. Resize 70% and move to the bottom center so it looks like your tube is kneeling on the R in spirit. See mine for placement. Drop shadow.
Open element 16, copy and close the original. Select raster 1 and paste. Move to the far right. See mine for placement. Duplicate and mirror.
Open element 45, copy and close the original. Select your tube layer and paste Resize 70% and move under the word art. See mine for placement. Drop shadow.
Open element 29, copy and close the original. Select the scatter layer and paste. Resize 50% and move to the bottom left beside the S in the word art. See mine for placement. Drop shadow.
Open element 30, copy and close the original. Select the tube layer and paste. Resize 50% and move to the far bottom left. See mine for placement. Drop shadow.
Open element 39, copy and close the original. Select the frame layer and paste. Resize 50% and move up and slightly to the right. You should be able to see the wording between the hat and pot of gold on your tube. Drop shadow.
Open element 15, copy and close the original. Select the frame layer and paste. Resize 70% and move to the right (see mine for placement). Duplicate and mirror.
Open element 26, copy and close the original. Select the tube layer and paste. Resize 50%. Adjust - Sharpness - Sharpen. Move to the bottom right in behind the IT and drop shadow.
Open paper of choice. I am using paper 12, copy and close the original. Select raster 1 and paste. Layers - New Mask Layer - From image. In the drop down find Vix St Patty day mask 2 - Source luminance selected - Invert unchecked. Click ok and merge group.
Add your copyright and name. If you are not going to animate, save as png.
Animation:
Select raster 1 and flood fill with white.
Now we need to hide everything from the tube layer and up by clicking on the eye beside each layer.
Edit - Copy Special - Copy merged and paste as new animation in animation shop (ctrl + v)
As Simone's animation has 20 frames we need to have 20 frames for our background that we just pasted. You should still have the background in your memory. Click on your background so it is highlighted. It will have blue around the frame. Hold ctrl + Shift and tap the L 19 times. You should now have 20 frames. You can see how many frames you have in the bottom right corner.

Select Simone's Animation, Select all ctrl + a and copy ctrl + c.
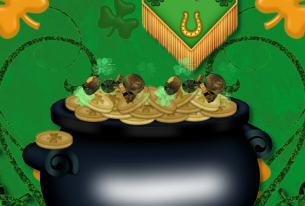
Back to the background animation. Select all ctrl + a and now we need to paste into selected frames ctrl + E. The animation will be hanging off your mouse. Place the animation on top of the pot of gold but on the right side. See screen shot below. Left click when you have it in the spot you want. If you make an error just hit ctrl + z. Now we need the animation on top of the left side of the pot of gold. We are going to repeat the paste into select frames ctrl + e and now place the animation on the left side and left click when happy with placement. See my screen shot below.


You can close off Simone's animation as we no longer need it.
Back to psp. Close off the open layers by clicking on the eye next to each layer including the white background layer. And make the top layers visible again from the tube layer up by clicking on the eye next to each layer.
Important as we need the animation all the same size. Select all. Edit - Copy special - Copy merged.
Back to animation shop and paste as new animation. ctrl + v. We will need 20 frames so holding down the ctrl + shift tap the L 19 times. You should now have 20 frames.
Select all ctrl + a and copy ctrl + e. Back to the background animation, select all ctrl + a and paste into select frames ctrl + e. Move the top portion of your tag until you find a spot you like then left click.
View your animation by clicking on the film icon next to the arrow with the ?. Once happy with your animation. Save as GIF
Click on save as, name your tag, and the options box will pop up after you click ok. Click in customize and the optimization tab. Only the 3 middle boxes should be selected. Click next, next, next and finished.
I hope you have enjoyed my tutorial. I would love to see your results.
Hugs,
Gwils
My Blinkie

I CT for


