My Tag Blog

Favorite Stores


My Favorite Blogs


Wednesday, February 7, 2024
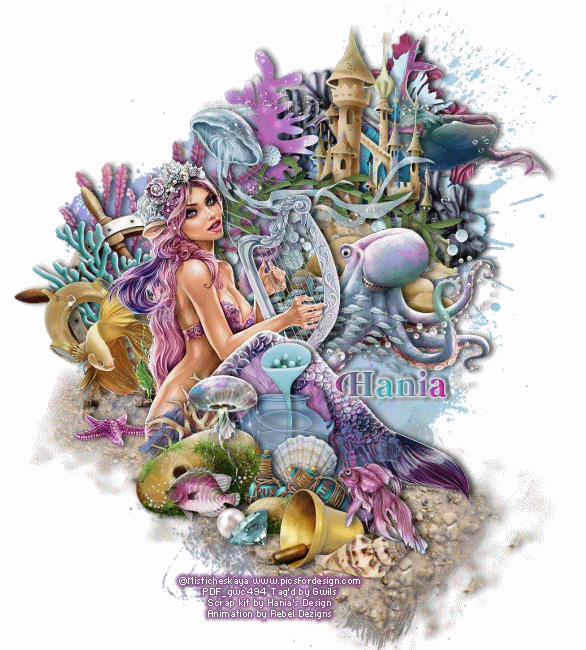
Mermaid Song
This tutorial was written by me on May 26, 2020. The results are of my own imagination. Any resemblance to another tutorial is purely coincidental.
Please DO NOT claim this tutorial as your own.
This was written assuming you have a working knowledge of PSP.
Please keep in mind that I write the tutorial as I am creating it.
Sometimes I may not explain properly where to place things so please see my example if you are ever in doubt :)
Supplies needed
I am using PSP 2018 but this tutorial should work with any version.
Animation shop (optional)
PTU Tube: I am using a PDF exclusive tube called "Magical Song" created by Misticheskaya. Please do not use this tubes without a proper license.
You can purchase this tube at Pics for Design here.
PTU Kit: I am using the gorgeous matching kit called "Magical Song" created by Hania's Design. You can purchase the kit at Pics for Design here.
Check out Hania's Design Blog here.
PTU Animation: I am using animations 982 & 984 from Rebel Dezigns animation package 327. You can purchase her awesome animation at CDO here.
Mask: Minja's design mask 3. Thank you for your awesome masks. You can download it from her blog here. Open and minimize in PSP.
Font of choice for your name.
Plug in: None
Drop shadow of choice.
Vivienne's Paintbox has awesome drop shadow settings that I use a lot. You can find the settings here and check out her awesome tutorials :)
Anytime you resize an element or tube you should sharpen it. Go to adjust, sharpness, sharpen.
Let's get started.
Remember to save your tag often in case psp crashes. I always save my tags as a pspimage. It keeps all the layers and if you make tags for others you will always have the template.
Open a new 750x800 transparent image. We will resize later.
Add a new layer and flood fill with white.
Copy Minja's mask and paste as a new layer. You can close the original as we no longer need it. Standing on the mask layer, resize by 90%. Go to Selections, Select all, Float, Defloat. Add a new raster layer. Open paper of choice. I am using paper 02. Copy and close the original. Standing on the new raster layer, go to Edit, paste into selections. Select none and delete the black mask layer as we no longer need it.
Open element 100, copy and close the original. Select the top layer and paste. Resize 60%, sharpen and drop shadow. Move to the upper right of the mask.
Open element 75, copy and close the original. Select the top layer and paste. Resize 60%, sharpen and drop shadow. Move to the upper right of the mask.
Open element 62, copy and close the original. Select the mask layer and paste. Resize 60% and move to the upper left of the castle. Duplicate and resize 80%. Drag this layer above the blue leaf layer and move to the bottom right of the castle. Sharpen and apply a drop shadow to each layer.
Open element 110, copy and close the original. Select the mask layer and paste. Resize 40%, sharpen and drop shadow. Move to the upper right of the castle.
Open element 87, copy and close the original. Select the blue leaf layer and paste. Resize 50%, sharpen and drop shadow. Move to the upper right about center of the frame layer.
Open element 74, copy and close the original. Select the castle layer and paste. Resize 60%, sharpen and drop shadow. Move to the upper left of the castle.
Open element 72, copy and close the original. Select the Pink leaf layer and paste. Resize 50%, sharpen, mirror and drop shadow. Move to the upper right so it is over part of the castle.
Open element 99, copy and close the original. Select the top layer and paste. Resize 50%, sharpen, and drop shadow. Move to the upper left of the pink leaf layer.
Open element 97, copy and close the original. Select the top layer and paste. Resize 40%, sharpen, and drop shadow. Move to the top of the castle. Duplicate and merge down.
Open element 07, copy and close the original. Select the top layer and paste. Resize 40%, sharpen, mirror and drop shadow. Drag this layer under the jellyfish layer. Move to the far left side about mid of the mask.
Open element 81, copy and close the original. Select the pink seaweed layer and paste. Resize 40%, sharpen, and drop shadow. Move to the bottom of the castle.
Open element 12, copy and close the original. Select the rock layer and paste. Resize 50%, sharpen, mirror, and drop shadow. Move to the left in front of the pink seaweed.
Open element 20, copy and close the original. Select the rock layer and paste. Resize 30%, sharpen, mirror, and drop shadow. Move to the left in front of the blue coral.
Open element 52, copy and close the original. Select the bubbles layer and paste. Sharpen, Image, free rotate to the right 15 degrees and sharpen. Move to up so it covers part of the pink seaweed. Duplicate this layer and move down to the top is under the gold fish. Merge down and duplicate again. Move towards the bottom of the mask. Merge down and drop shadow.
Open element 14, copy and close the original. Select the pink seaweed layer and paste. Resize 40%, sharpen, and drop shadow. Move to the left so it is in front of the pink seaweed and behind the blue coral.
Open element 06, copy and close the original. Select the sand layer and paste. Resize 30%, sharpen and drop shadow. Move to the bottom left just in front of the gold fish.
Open element 60, copy and close the original. Select the ship wheel layer and paste. Resize 50%, sharpen and drop shadow. Leave it where it is.
Open element 80, copy and close the original. Select the rock layer and paste. Resize 50%, sharpen and drop shadow. Move to the right so it is in front of the rocks and you can see it's face.
Open element 86, copy and close the original. Select the octopus layer and paste. Resize 60%, sharpen and drop shadow. Move it in front of the octopus's arms.
Open element 89, copy and close the original. Select the starfish layer and paste. Resize 35%, sharpen and drop shadow. Move it to the bottom blue coral.
Open element 93, copy and close the original. Select the helmet layer and paste. Resize 50%, sharpen and drop shadow. Move it down slightly.
Open your tube and select the layers you wish to use. Go to edit, copy special, copy merged. Select the top layer and paste. Resize 25%, sharpen and drop shadow. Move her to the bottom left so she looks like she is sitting in the sand.
Open element 92, copy and close the original. Select the tube layer and paste. Resize 30%, sharpen and drop shadow. Move it down by the tube's bottom.
Open element 45, copy and close the original. Select the tube layer and paste. Resize 60%, sharpen and drop shadow. Move it down by the tube's legs/fin and behind the rock.
Open element 76, copy and close the original. Select the tube layer and paste. Resize 30%, sharpen and drop shadow. Move it down by the tube's knees and behind the small rock.
Open element 83, copy and close the original. Select the flower spray layer and paste. Resize 60%, sharpen and drop shadow. Move it down behind the rocks.
Open element 79, copy and close the original. Select the purple leaf layer and paste. Resize 40%, sharpen and drop shadow. Move it down behind the rocks.
Open element 85, copy and close the original. Select the blue stalk layer and paste. Resize 20%, sharpen and drop shadow. Move it down in front of the vase.
Open element 50, copy and close the original. Select the top layer and paste. Resize 20%, sharpen and drop shadow. Move it down in front of the large rock.
Open element 78, copy and close the original. Select the purple leaf layer and paste. Resize 30%, sharpen and drop shadow. Move it down in behind the large rock.
Open element 10, copy and close the original. Select the blue twirl layer and paste. Resize 30% and sharpen. Move it down in behind the rocks. Now that I have it in place, I would like part the left bottle to show in front of the big rock. Standing on the rum bottles, Select all, float, defloat. Using your eraser brush, carefully erase the the rock that is over the top of the bottle. Be careful not to erase any of the small rock. If you make an error, just hit Ctrl+Z and retry. Once you have erased the rock, select none and drop shadow the bottles.

Open element 78, copy and close the original. Select the top layer and paste. Resize 30%, sharpen and drop shadow. Move it down in to the bottom of the large rock.
Open element 31, copy and close the original. Select the blue twirl layer and paste. Resize 20%, sharpen and drop shadow. Move it down behind the rum bottles.
Open element 59, copy and close the original. Select the top layer and paste. Resize 60%, sharpen and drop shadow. Move it to the bottom of the sand.
Open element 54, copy and close the original. Select the top layer and paste. Resize 30%, sharpen and drop shadow. Move it to the bottom of the small rock.
Open element 27, copy and close the original. Select the top shell layer and paste. Resize 30%, sharpen and drop shadow. Move it to the bottom left of the diamond.
Open element 03, copy and close the original. Select the top fish layer and paste. Resize 40%, sharpen and drop shadow. Move it to the bottom behind the top shell.
Open element 95, copy and close the original. Select the top layer and paste. Resize 30%, sharpen and drop shadow. Move it to the bottom above the top shell.
Add any other elements you like and make any adjustments to the layers.
Crop away any extra space. Resize 650 on the longest side, all layers checked.
Add your copyright and name.
If you do not want to animate, hide the white layer and save as png.
Animation:
Animating the tag. Make sure your tag is saved as you do not want to loose it if psp crashes.
Might want to grab a coffee :)
Open Rebel Designs ani 982 & 984 in psp.
You can use all 25 layers if you chose but it will be heavy on the animation. I am going to only use all odd numbered layers.
Standing on layer 25 in the layer pallet, hold down your Ctrl and select the next odd number layer 23. Repeat this until you have all odd number layers highlighted in the layer pallet. All odd layers selected? Now for the next step.
Go to layers, New group layer. A window will pop open and click ok.
Scroll all the way to the top. You will see a new layer called Group 1 with all the even layers under it. This is what we want to see :). Beside the group 1 layer you will see a little white arrow pointing down. Click on this to collapse the animation. In the upper right of the layer pallet you will see an icon that looks like a chain link. Click on this. You will now notice a change link on your group 1 layer. This will lock all the layers so when you need to move it or resize it all the layers under group 1 will move or resize at the same time.
Standing on group 1, go to edit and copy. Now back to your tag and paste as a new layer. Unfortunately, the ani will only paste to the very top. Click on the little white arrow beside group 1 to collapse it again. Close off the original animation as we will not need it and do not save.
I want group 1 (ani 982) to be below the ships wheel layer. Select group 1, left click your mouse and drag the group layer down the layer pallet until it is under the ship's wheel layer. Or you can go to Layers arrange, Move down and repeat this until it is under frame layer.
Move the animation into a spot you like best. I resized the group by 40%, all layers not checked and moved the ani center of the castle.
Repeat the above steps for Animation 984. I resized this animation by 25% and moved this group just above the purple leaf layer and moved it over towards the right.
Next step. You will need to do all the steps below for both animations.
Select the little arrow beside group 1. This will expand the group.
You will see all the numbered layers. Starting with frame 25, click on the eyeball beside this layer repeat this step for all the layers so only layer 1 is visible.
Open animation shop.
Back to psp. With only frame 1 of the animations visible, edit, copy special, copy merged.
Back to Animation shop.
Edit, paste as new animation or keyboard shortcut Ctrl+V.
**Back to psp.
Hide Frame 1 by clicking on the eyeball and unhide frame 3 by clicking on the eyeball on both animations. Edit, copy special, copy merged.
Back to Animation Shop.
We need to paste after current frame. Go to edit, paste after current frame. Keyboard shortcut Shift+Ctrl+L**
Repeat from **to** until you have 13 frames in animation shop. It will tell you on the bottom right corner how many frames you have.
Go to file Save as, gif and click next and next until you hit finished. I use the default settings.
I hope you have enjoyed my tutorial. I would love to see your results.

My Blinkie

I CT for