My Tag Blog

Favorite Stores


My Favorite Blogs


Thursday, February 1, 2024
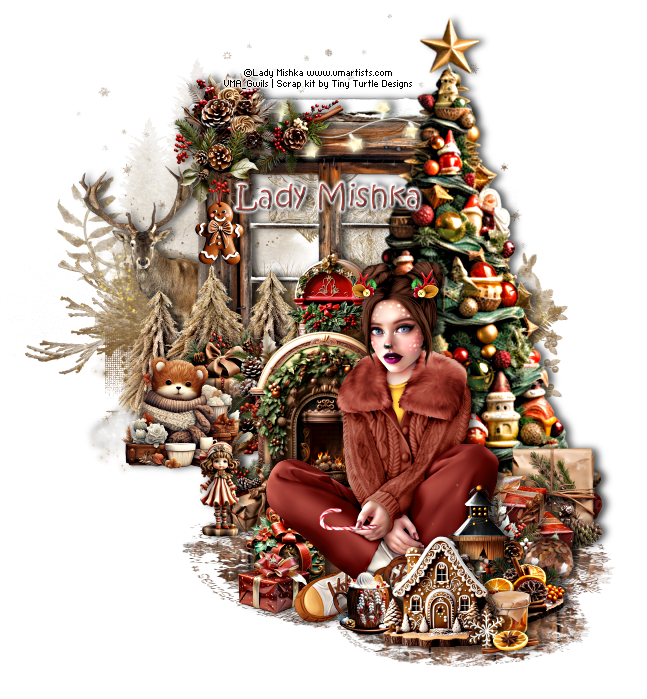
Christmas Deer Girl
This tutorial was written by me on December 16, 2023. The results are of my own imagination. Any resemblance to another tutorial is purely coincidental.
Please DO NOT claim this tutorial as your own.
This was written assuming you have a working knowledge of PSP.
Please keep in mind that I write the tutorial as I am creating it.
Sometimes I may not explain properly where to place things so please see my example if you are ever in doubt :)
Supplies needed
I am using PSP 2018 but this tutorial should work with any version.
PTU Tube: I am using Lady Mishka's beautiful multi-layered tube "Christmas Deer Girl". Please do not use this tube without a proper license. You can purchase it at VM Artists here.
PTU Kit: I am using a gorgeous matching kit called "Christmas Deer Girl" created by Tiny Turtle Designs. You can purchase her beautiful kit here.
Mask: xmask21_fecnikek (3) and (2). Thank you for your awesome masks. You can download it from Fecnikek's blog here.
Font of choice for your name.
Plug in: None
Drop shadow of choice.
Please read all the Artist's/Designer's TOU.
Don't forget to sharpen each image that you resize.
Let's get started.
Open a new 800x800 transparent image. We will resize later.
Flood fill with white.
Copy Fecnikek mask (3) and paste as a new layer. Resize 17% and move to the top center slightly to the left. Select all, float, defloat and add a new raster layer.
Copy paper 8. Standing on the new raster layer, paste into selections. Select none and delete the original mask layer.
Copy element 33 and paste as a new layer. Resize 40% and move to the far left of the mask. Drop shadow.
Copy element 34 and paste as a new layer. Resize 60% and move to the center of the mask so the moose head shows in the window. Drop shadow.
Copy element 36 and paste as a new layer. Resize 50% and move to the top of the window. Drop shadow.
Copy element 19 and paste as a new layer. Resize 15% and move to the top right of the window. Drop shadow.
Copy element 89 and paste as a new layer. Resize 15% and move to the top right of the window. Drop shadow.
Copy element 91 and paste as a new layer. Resize 15% move to the left center of the window. Drop shadow.
Copy element 84 and paste as a new layer. Resize 15%, mirror and move to the bottom of element 89. Drop shadow.
Copy element 31 and paste as a new layer. Resize 50% and move to the bottom left of the window. Drop shadow but check the box for the shadow to be on a new layer. Standing on the shadow layer, use your eraser tool set to 50 and hardness set to 60, erase the bottom shadow from the trees.
Copy element 105 and paste as a new layer. Resize 25% and move to the bottom center of the window. Drop shadow. Remember to uncheck shadow on a new layer.
Copy element 24 and paste as a new layer. Resize 15% and move to the bottom center of the trees. Drop shadow.
Copy element 90 and paste as a new layer. Resize 20% and move to the bottom right of the trees. Drop shadow.
Copy element 21 and paste as a new layer. Resize 20% and move to the left of the present. Drop shadow.
Copy element 106 and paste as a new layer. Resize 80% and move to the right side of the window. Drop shadow.
Copy element 113 and paste as a new layer. Resize 30% and move to the left of the Christmas tree. Drop shadow.
Copy element 104 and paste as a new layer. Resize 12% and move to the lower left of the fire place. Drop shadow.
Copy element 80 and paste as a new layer. Resize 15% and move to the bottom bottom left of the present. Drop shadow.
Copy element 87 and paste as a new layer. Resize 15% and move to the bottom right of the Christmas tree. Drop shadow.
Copy element 119 and paste as a new layer. Resize 10% and move to the bottom right of the present. Drop shadow.
Copy element 102 and paste as a new layer. Resize 25% and move to the bottom of the Christmas trees. Drop shadow.
Copy element 110 and paste as a new layer. Resize 15% and move to the bottom right of the doll. Drop shadow.
Copy element 98 and paste as a new layer. Resize 15% and move to the bottom of element 110. Drop shadow.
Copy your main tube. Resize 12% and move her so she shows between the fireplace and tree. Drop shadow.
Copy element 99 and paste as a new layer. Resize 15% and move to the bottom right of the tube. Drop shadow.
Copy element 27 and paste as a new layer. Resize 10%, free rotate to the right 20 degrees and move to the bottom of the red presents. Drop shadow.
Copy element 45 and paste as a new layer. Resize 20% and move to the bottom right of the tube. Drop shadow.
Copy element 25 and paste as a new layer. Resize 15% and move to the bottom right of the the lantern. Drop shadow.
Copy element 55 and paste as a new layer. Resize 8% and move to the bottom of element 25. Drop shadow.
Copy element 112 and paste as a new layer. Resize 12% and move to the bottom center of the tube. Drop shadow.
Copy element 20 and paste as a new layer. Resize 20% and move to the bottom left of the lantern. Drop shadow.
Copy element 121 and paste as a new layer. Resize 7% and move to the bottom right of the house. Drop shadow.
Copy element 54 and paste as a new layer. Resize 10% and move to the bottom right of the cookie and jam. Drop shadow.
Select the mask layer.
Copy Fecnikek mask (2) and paste as a new layer. Resize 15%. Using your pick tool set to scale, drag the top down and pull out the sides a bit. Move under the tube layer. See mine for placement. Select all, float, defloat and add a new raster layer.
Copy paper 17. Standing on the new raster layer, paste into selections. Select none and delete the original mask layer. Duplicate the mask and resize 60% and move to the lower right under the elements.
Add any other elements you like and make any adjustments.
Crop away any extra space. Resize 650 on the longest side, all layers checked.
Add your copyright and name.
Hide the white background layer Save your tag and export as png.
I hope you have enjoyed my tutorial. I would love to see your results.
My Blinkie

I CT for


